After a rough day at the the food bank's farm, I wanted to do nothing else besides make some ice cream. I made the sorbet last week, but I haven't made an actual ice cream in weeks and was starting to go through withdrawal. That desire plus my never-ending addiction to peanut butter let to today's creation.
Peanut Butter Ice Cream
2 C heavy whiping cream
1 1/2 C whole milk
2 egg yolks
3/4 C sugar
1 tsp vanilla
1 C peanut butter
I started by making the standard ice-cream base custard (read below to the post entitled I Love Ice Cream More Than Words Can Say to get a full description of the custard-making process). While the custard was still hot, I poured it into a bowl and added the 1 cup of peanut butter and stirred until it was totally melted and uniform. I then added the heavy cream and vanilla before chilling it in the fridge and putting it in the ice cream maker.
Anyone that knows me personally knows that I live and die by crunchy peanut butter. I believe you can tell what type of person someone is by the type of peanut butter they eat. But unfortunately I had to suck it up and use creamy peanut butter in this recipe for two reasons: 1) that is all that I had enough of (the people living in this house before us left an unopened jar, whereas my crunchy peanut butter is almost gone, and 2) While I have heard that adding peanuts to the ice cream makes it amazing, I had my concerns about the churning ability of this ice cream if it had crunchy peanut butter as opposed to whole peanuts.
This ice cream is very good! After the fact I thought of the idea of making peanut butter and jelly ice cream, but that must wait until another day. I have extra cream & milk left, so be on the lookout for another ice cream in the next week or so. My inclination right now is to try out avocado ice cream, which has been on my list of flavors to try for some time now. And avocados are so cheap here compared to the east coast that I feel obligated to give it a try!
Saturday, September 27, 2008
Monday, September 22, 2008
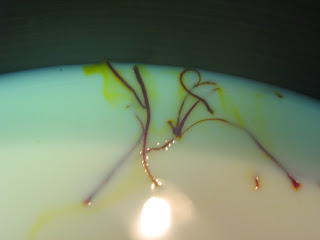
Prickly Pear Sorbet!
Internet has been installed in my house and I am back in business! Thanks for your patience, friends.
When I found out that I was moving to Tucson for my fellowship placement, one of the first things I thought of was how awesome it would be to make prickly pear sorbet. I shipped my ice cream maker all the way across the country with this idea in mind. When I landed last week and asked where I could find prickly pear cactus fruit, I was informed that most of the cacti around stopped producing fruit the week before. My dreams quickly came crashing down on me inside an hour of landing! I kept my eye out for some prickly pear fruits but none could be found.
Last week, Raquel (my field site partner) and I went to our Mennonite Volunteer Service (MVS) friend's house for dinner. They told me that their prickly pear cactus had fruit left, but when I went out to check they had all been harvested earlier in the day. Again, my plan had been foiled! So I asked if they knew of anywhere that still had some fruit growing and I was informed that the gas station by my house had tons left.
So I left the MVS house complete with a bucket and tongs in hand (the fruit has tiny thorns on its skin so you can't pick them with your bare hands) in the middle of the night (actually more like 8:30, but it was dark out and I was still on east coast time). And much to my delight, there were hundreds if not thousands of prickly pear fruits growing all over the cacti in the gas station parking lot! And we harvested those fruits like crazy...almost an entire bucket full!

Now to make the sorbet. I had to run each fruit under cold water and wipe the thorns off while wearing a rubber glove and then again into a dish towel. Once that was done, I cut a half inch slit into the skin length wise on one side and peeled the rest of the skin away.

The fruit was then thrown into the blender and then the seeds and flesh were strained out, leaving only the juice. I took a half cup of the juice and put it in a pot with 1 cup of sugar and heated it for about 10 minutes to make a simple syrup. The syrup was then mixed back in with the rest of the juice with a splash of orange juice (since I didn't have lemon juice which is usually added to sorbets to help with the flavor), chilled, and then went to freeze in the mixer.
The sorbet has a a very unique taste. The fruit itself has very little flavor so the sugar and orange juice helped a lot. Te taste really can't be compared to anything I have ever had. It is sweet and tart. The only bad thing is that it leaves a funky aftertaste in your mouth. But it is such a gorgeous color!

On another note, the garden we planted is coming along well. Much was added since my post last week. We now have three types of basil (sweet, lemon, and thai), rosemary,sage, two strawberry plants, a habanero pepper, and 5 green bell pepper plants. Our onion seeds started sprouting today, which is so exciting, along with some mesclun and winter squash. There are also carrot, cilantro, parsley, chives, spinach, kale, sugar snap peas, and a few other seeds we are waiting to sprout.
My field placement for the fellowship is at the Community Food Bank here in Tucson. This food bank is so amazing and incredibly progressive in the field! They don't only pass out emergency food boxes, but they have their own farm which grows for their own farmers markets, garden classes, home garden instruction, and little grocery store, and so much more. I am working in the Community Food Security Center and most of my work will involve promoting all of the amazing work of the Center and creating a publication about the southern Arizona food system to show people how their food choices have a large impact on the community around them. Before starting on my project, though, I have been working all around the food bank to get a better understanding of how all their programs work. I am also working with Raquel on a project to show people just how much food can be bought with a $10 voucher at the food store and recipes they can use with those food lists.
So overall, things are amazing here in Tucson. I miss my family and friends so much, but I have never felt like I am in the right place as much as I do now. I know that I will be doing work that will help the Commuity Food Security Center, the food bank, and the community around me while giving me such invaluable experience. I know that I have learned an unbelievable amount during the week and a half of training and my week here in Tucson. I am looking forward to seeing what else I will learn over the next 5 months!
So, does anybody have any ice cream flavor ideas? Let me know in the comments!!
Thanks for reading and thanks for your patience while I was training/moving/getting settled/getting internet!
-Eric
Monday, September 15, 2008
Pictures of my Tucson House
There hasn't been any time for cooking yet, but I was able to upload a few pictures of my new house. They can be viewed from the link below:
http://www.flickr.com/photos/tyrannyofdistance/sets/72157607306017688/
My favorite part is the huge kitchen! (compared to any previous kitchen I've cooked in before). Raquel, my housemate & fellow fellow, and I also planted a little herb garden this morning complete with thai basil, lemon basil, sage, and rosemary. The soil is so dry here, but we will water them tons and hope they survive!
Be back again soon!
-eric
Sunday, September 14, 2008
Alive & in Tucson
Hello friends! I am alive and well. Fellowship training was intense but amazing and I made it safely to Tucson, AZ yesterday afternoon. My house does not have internet (although it has a HUGE amazing kitchen) so posts will continue to be infrequent until I get that fixed. I am currently using the free wi-fi at Safeway, which is not the ideal place to get work done on the internet...but alas.
What have people been cooking themselves Post recipes!
I shall return ASAP.
What have people been cooking themselves Post recipes!
I shall return ASAP.
Tuesday, September 2, 2008
Slow on the Posts (+ Cinnamon Ice Cream)
The recent lack of cooking posts on Hungry Sprout will continue for about two weeks. This past week I went to the beach, visited St. Mary's, and have been packing for training in DC and the move to Tucson!
I did manage to make cinnamon ice cream a few days ago, which turned out incredible well. Simply add 2-3 teaspoons of ground cinnamon to the ice cream custard once take it off the heat and add the cream (see the french vanilla ice cream recipe below). Sorry for a lack of full directions.
So I am off for fellowship training this afternoon and won't be able to cook again until I get settled in Tucson. But I will have my computer and will try to update while at training if I learn anything interesting!
Wish me luck!
Sunday, August 17, 2008
Mango Saffron Ice Cream & Peach Pie
As promised, I have made an ice cream flavor recommended by a reader! Thanks to a comment posted by “bite me,” I made mango saffron ice cream yesterday to give to a friend as a graduation gift. As with all my ice creams, I used my standard recipe for French vanilla while making a few changes.
I started by bringing 1½ C milk to a simmer with about ¼ teaspoon of saffron. Once small bubbles started to appear, to took the pot off the heat and let the saffron steep for 30 minutes.
Next, I strained the saffron out of the milk and continued with the rest of the recipe. I added ¾ C sugar to the milk and brought this back to a simmer. I then tempered in two egg yolks and stirred for about 10 minutes, until a thick custard was formed. The custard was then put in the fridge to cool for a few minutes.
Meanwhile, I cut and pureed two mangos. Once the custard had cooled some, I added two cups of heavy whipping cream and stirred in the mango puree. This mixture was then placed in the fridge to cool for a few hours before placing it in the ice cream maker for 15 minutes.
I was unsure how this recipe would work out and was pleasantly surprised at how well it turned out! You first taste the mango by itself, and then slowly the saffron comes in at the end. Both flavors are very subtle and nice. This ice cream mixes a pleasant amount of sweetness from the mango and savory from the saffron to create a unique and incredibly enjoyable dessert. Thanks so much to “bite me” for the recommendation!
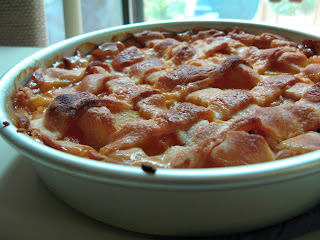
That same afternoon I made a peach pie to bring to a dinner party at night. The recipe I used from the Joy of Cooking (a.k.a. the Bible) called for homemade pie dough for the crust. Normally, I avoid store-bought dough at all costs, but do to a lack of time (and a lack of shortening, which is required for any successful pie crust that is both soft and flaky, thank you Alton Brown) I bought a box of two rolls of pie crust. The recipe is as follows, changed slightly from the original to match my adjustments:
Peach Pie
Line a 9-inch pie pan with:
1 rolled out pie dough (store bought or home-made)
Preheat the oven to 425º F.
Peel, pit, and slice ¼ inch thick:
2 ½ pounds peaches (6 peaches for me)
Combine in a bowl with:
½ C sugar
3 Tbsp all-purpose flour
3 Tbsp lemon juice
1/8 teaspoon salt
Let stand for 15 minutes, stirring occasionally. Pout the filling into the bottom crust and dot with:
2 Tbsp unsalted butter, cut into small pieces
Cover the pie with a lattice made from a second piece of rolled out pie dough. Lightly brush this top crust with:
Milk
Sprinkle with:
2 Tbsp sugar
Bake about 55 minutes. Cool completely on a rack.
The pie was incredible and was better than any store-bought peach pie I have ever had. Making the lattice was easy, and was simply done by cutting strips about an inch thick out of rolled out pie dough, laying about half horizontally and then covering those with the other strips vertically. Brushing the top with milk definitely gave the pie a gorgeous golden brown color. Pictures are below!


I started by bringing 1½ C milk to a simmer with about ¼ teaspoon of saffron. Once small bubbles started to appear, to took the pot off the heat and let the saffron steep for 30 minutes.

Next, I strained the saffron out of the milk and continued with the rest of the recipe. I added ¾ C sugar to the milk and brought this back to a simmer. I then tempered in two egg yolks and stirred for about 10 minutes, until a thick custard was formed. The custard was then put in the fridge to cool for a few minutes.
Meanwhile, I cut and pureed two mangos. Once the custard had cooled some, I added two cups of heavy whipping cream and stirred in the mango puree. This mixture was then placed in the fridge to cool for a few hours before placing it in the ice cream maker for 15 minutes.
I was unsure how this recipe would work out and was pleasantly surprised at how well it turned out! You first taste the mango by itself, and then slowly the saffron comes in at the end. Both flavors are very subtle and nice. This ice cream mixes a pleasant amount of sweetness from the mango and savory from the saffron to create a unique and incredibly enjoyable dessert. Thanks so much to “bite me” for the recommendation!
That same afternoon I made a peach pie to bring to a dinner party at night. The recipe I used from the Joy of Cooking (a.k.a. the Bible) called for homemade pie dough for the crust. Normally, I avoid store-bought dough at all costs, but do to a lack of time (and a lack of shortening, which is required for any successful pie crust that is both soft and flaky, thank you Alton Brown) I bought a box of two rolls of pie crust. The recipe is as follows, changed slightly from the original to match my adjustments:
Peach Pie
Line a 9-inch pie pan with:
1 rolled out pie dough (store bought or home-made)
Preheat the oven to 425º F.
Peel, pit, and slice ¼ inch thick:
2 ½ pounds peaches (6 peaches for me)
Combine in a bowl with:
½ C sugar
3 Tbsp all-purpose flour
3 Tbsp lemon juice
1/8 teaspoon salt
Let stand for 15 minutes, stirring occasionally. Pout the filling into the bottom crust and dot with:
2 Tbsp unsalted butter, cut into small pieces
Cover the pie with a lattice made from a second piece of rolled out pie dough. Lightly brush this top crust with:
Milk
Sprinkle with:
2 Tbsp sugar
Bake about 55 minutes. Cool completely on a rack.
The pie was incredible and was better than any store-bought peach pie I have ever had. Making the lattice was easy, and was simply done by cutting strips about an inch thick out of rolled out pie dough, laying about half horizontally and then covering those with the other strips vertically. Brushing the top with milk definitely gave the pie a gorgeous golden brown color. Pictures are below!


Monday, August 11, 2008
Sushi Party!
The last piece of meat I have ever eaten was sushi in Kobe, Japan. I thought it would be the most ceremonious way to end my carnivorous career and indeed eating raw octopus and some other unidentified raw fish (I can only hope they were some kind of sea creature) was an experience! I had always been a huge fan of sushi before, my favorite being shrimp tempura. In fact, shrimp tempura is one of the only meat-filled foods I ever crave anymore. I do love veggie sushi, particularly avocado rolls and asparagus tempura rolls, but it always seems like a very expensive meal to buy at a restaurant, seeing as it is only a small piece of vegetable wrapped in a palm-full of rice. I have always been tempted to make my own sushi, but never seemed to have the time to actually pull it off. So when Rose asked me what I wanted to make for my birthday dinner, sushi seemed like the perfect choice!

Neither of us had ever made sushi, nor did we do any research like we normally do before trying a new dish. We entered the kitchen with a pot of sticky rice, nori (seaweed paper), some veggies, and tempura batter and just went at it.
First was prepping all the veggies and cutting them into small, thin pieces. We started with carrot, cucumber, avocado, and red pepper. Next, we cut up some sweet potato, onion, zucchini, yellow squash, green beans, and mushrooms to be fried in the tempura batter.

We started frying the tempura vegetables until they were golden brown in a pot of hot peanut oil. I never fry unless I have to since I have an aversion to flesh-burning-hot oil for some reason…but I overcame this apprehension for my love of tempura. For the most part, the frying went well and there were no serious burns or other injuries.

After the cutting and frying was complete, we were ready to start rolling the sushi! Thankfully the nori package had directions and little diagrams. While sushi seems somewhat self-explanatory, once you are standing there in front of the sushi mat, the task seems slightly daunting that first time. We placed a sheet of nori on a sushi mat and then spread about a ½ cup of sticky rice over the nori. Starting with the end closest to us, we started laying the veggies in thin rows next to each other. I then started rolling the mat up, making sure to squeeze the sushi roll right throughout so that it keeps its form.

Once rolled, we cut the sushi into 6-8 pieces. After trial-and-error, we discovered that you have to cut the roll in the same direction that the nari was rolled. If not, the cuts become rough and the sushi pieces start to fall apart.

I was surprised to find how easy it was make the sushi rolls! We served the sushi and tempura vegetables with a side of soy sauce, soy & wasabi, and teriyaki. For about the same price of ordering a few rolls of sushi at a restaurant, we were able to make easily 50 pieces, enough to feed four people and still have leftovers for another meal.

This will be my last DC post for about 7 months, since I will be moving back to Baltimore for three weeks before I leave for Tucson, AZ! But that does not mean the end of posts! I will continue writing about my cooking experiences from across the country plus my experiences working at the Tucson food bank. I am sure there will be an increase in the amount of ice cream I make since I hear the heat can be atrocious.

So please leave some ideas for a fun/crazy/unique ice cream flavor for me to (try to) make!
Also, I added a little gadget to the top right of the page so you can subscribe and be told whenever I post something new. Or add the Hungry Sprout to Google Reader, a nifty new application I started using myself for reading blogs!

Subscribe to:
Comments (Atom)


