This weekend I am flying out to Austin, TX for the fellowship mid-field retreat. There we will get to see our fellow fellows, decompress from our experiences so far, continue some conversations that were started during training in September, plan ahead, and hopefully relax some as well! It is really hard to believe that the first half of the field placement has gone by!
We were asked to bring in something (creative) to help describe our life in our field placements. After much brainstorming (although it seems obvious at the time) I decided to bake something! I thought it would be great to use an ingredient that is pretty special to Tucson and I decided on mesquite flour. The mesquite tree grows throughout the Southwest and is everywhere in Tucson! It had pods that can be ground up into flour. Thankfully, our Mennonite friends had some extra mesquite flour lying around and I found this amazing recipe online! (it was from a random google search and I don't remember exactly where it was from, sorry!)
Mesquite Chocolate Chip Cookies
2 1/2 cups whole-wheat pastry flour
1 cup mesquite flour, sifted if clumpy
1 teaspoon baking soda
1 teaspoon baking powder
3/4 teaspoon fine-grain sea salt
1 cup unsalted butter, at room temperature
2 cups natural cane sugar
3 large eggs
1 tablespoon pure vanilla extract
2 cups rolled oats
2 cups semisweet chocolate chips
Preheat the oven to 375°F, position the racks in the upper half of the oven, and line 2 baking sheets with parchment paper.
Whisk together the flours, baking soda, baking powder, and salt in a bowl. Set aside.
In a large bowl or stand mixer, beat the butter until light and fluffy, then beat in the sugar until of a consistency like thick frosting. Beat in the eggs one at a time, incorporating each fully before adding the next and scraping down the sides of the bowl a few times. Stir in the vanilla until evenly incorporated. Add the dry ingredients in 3 increments, stirring between each addition. At this point, you should have a moist, uniformly brown dough. Stir in the oats and chocolate
chips by hand, mixing only until evenly distributed.
Drop 2 tablespoons of dough for each cookie onto the prepared baking sheets 2 inches apart and bake for about 10 minutes, until golden on both top and bottom. Don’t overbake these; if anything, underbake them. Cool on wire racks.
Makes 2 to 3 dozen chunky, medium-large cookies.
The mesquite flour has a nice sweet and grainy taste to it, unlike any other flour I have ever had. It adds a really nice texture and flavor to these amazing cookies (it is also supposedly very good for you too!) I was unsure how all whole-wheat and mesquite cookies would turn out but I guess that ton of butter and sugar helps out! Hopefully they will be a hit with my fellow fellows!
There is a great group here in Tucson called Desert Harvesters, that has it's own mill and travels around Southern Arizona so people can mill their own mesquite pods. This is a really great thing because not only are people exposed to a healthy, incredibly local food (right from their backyard!), it has also been a way for people who have trouble affording healthy food to help feed themselves and maybe make a little extra income by selling the flour to their friends and neighbors.
My actual work at the Community Food Bank for the fellowship has been going great (and slightly exhausting) I have been traveling all around town (Phoenix 3 times in the last week!!) interviewing people for the document I am helping to write on Southern Arizona's local food system. I am focusing specifically on sustainable agriculture & government and community responses to hunger. I have interviewed tons of people already, including someone from Desert Harvesters, two organic farmers, a State Representative, someone from a WIC clinic, a teacher at a school garden, and many others. My job basically consists of talking to amazing, talented, bright people with tons of experience, learn from them, and write about it to share with the community. I can't really think of a better job than that! I expect the interviews to come to a close soon and then the writing will begin. If anyone is interested in reading what I write as it comes along, let me know. I will need editors!!
Thursday, November 13, 2008
Tuesday, November 11, 2008
Pumpkin Pancakes & Apple Cider Syrup
I think I have mentioned how terribly I am missing autumn before. I miss the cool breeze, the changing leaves, and the smell of cinnamon, nutmeg, ginger, and cloves. Thankfully I have access to the spices since the first two are impossible to buy in the desert.
I had some extra pumpkin and had this urge to make pumpkin pancakes for a while, so on Sunday morning I made them for our lovely wonderful guests from CA! The recipe is from allrecipes.com, (one of the best recipe sites, btw!) To top off this delicious breakfast, I threw together an amazing apple cider syrup.
Pumpkin Pancakes
Ingredients
Directions
The pancakes were wonderful and fluffy. I was unsure what the wheat flour and pumpkin would do to the texture but they turned our really well. The pumpkin pancakes weren't very sweet so it was a good thing we had the syrup on hand! The combination of pumpkin, spices, and apple cider was really amazing. Expect some more pumpkin/apple cider combinations in the future!
I had some extra pumpkin and had this urge to make pumpkin pancakes for a while, so on Sunday morning I made them for our lovely wonderful guests from CA! The recipe is from allrecipes.com, (one of the best recipe sites, btw!) To top off this delicious breakfast, I threw together an amazing apple cider syrup.
Pumpkin Pancakes
Ingredients
- 2 cups all-purpose flour (I used 1/2 whole wheat flour)
- 3 tablespoons brown sugar
- 2 teaspoons baking powder
- 1 teaspoon baking soda
- 1 teaspoon ground allspice
- 1 teaspoon ground cinnamon
- 1/2 teaspoon ground ginger
- 1/2 teaspoon salt
- 1 1/2 cups milk
- 1 cup pumpkin puree
- 1 egg
- 2 tablespoons vegetable oil
- 2 tablespoons vinegar
Directions
- In a separate bowl, mix together the milk, pumpkin, egg, oil and vinegar. Combine the flour, brown sugar, baking powder, baking soda, allspice, cinnamon, ginger and salt, stir into the pumpkin mixture just enough to combine.
- Heat a lightly oiled griddle or frying pan over medium high heat. Pour or scoop the batter onto the griddle, using approximately 1/4 cup for each pancake. Brown on both sides and serve hot.
The pancakes were wonderful and fluffy. I was unsure what the wheat flour and pumpkin would do to the texture but they turned our really well. The pumpkin pancakes weren't very sweet so it was a good thing we had the syrup on hand! The combination of pumpkin, spices, and apple cider was really amazing. Expect some more pumpkin/apple cider combinations in the future!
Sunday, November 2, 2008
Wine Tasting & Pumpkin Carving
Yesterday afternoon/night my friend Carmen & I went wine tasting in Tucson! We heard of one place from a friend, but when I looked online I could find nothing about it. But fate was on our side when I found out about a "Spooky Halloween Treats" tasting at CataVinos. How could you not go to that?! The owner, Yvonne, was amazingly kind and taught us all about how to taste wine and the reasons for doing the certain things. Like, did you know that when you swirl a glass of wine counter-clockwise you can smell the alcohol more, but if you go clockwise you can smell the fruit? I didn't believe it at all until I tried it, and whoah! Its crazy but true! The wine names and/or labels were all "spooky" in nature, like "Big Red Monster," or "Evil," and a reisling in a bottle the shape of a black cat! They were all delicious and I plan on going back there at least a few more times before I head back east!
So, I officially cant do anything political because of the fellowship, which is funded by the Congress in the Farm Bill. But I will just post this picture of a pumpkin I "found" (and..umm...didnt carve, thanks to the help of www.yeswecarve.com) because I thought it was awesome..and I will...umm...post a McCain pumpkin as soon as I find one...to be..fair and balanced? Yeah, thats it! On a completely unrelated note and an entirely different pumpkin! I baked the seeds with cinnamon and brown sugar, and saved some others for planting next year in DC!


So, I officially cant do anything political because of the fellowship, which is funded by the Congress in the Farm Bill. But I will just post this picture of a pumpkin I "found" (and..umm...didnt carve, thanks to the help of www.yeswecarve.com) because I thought it was awesome..and I will...umm...post a McCain pumpkin as soon as I find one...to be..fair and balanced? Yeah, thats it! On a completely unrelated note and an entirely different pumpkin! I baked the seeds with cinnamon and brown sugar, and saved some others for planting next year in DC!


Sunday, October 26, 2008
The Weekend of Fixed Kitchen Disasters
I have had three major disasters in the kitchen since I started cooking: Crème brûlée, gnocchi, and caramel sauce (I don't even want to talk about that last one...) But this weekend I inadvertently tackled and defeated the first two!
I first attempted to make crème brûlée last spring at St. Mary's. I had Amish cream and organic free-range eggs from the farm, the best of the best as far as ingredients go. I followed the directions in the Joy of Cooking to a "T" and I must say that this is the only time Joy has ever failed me. The recipe said the custard was supposed to be in the oven for half an hour. Two hours later, I still had a liquid in my little mugs/make-shift ramicans (which also served as make-shift wine glasses). I was frustrated and didn't know what I did wrong so I tossed them...Only later to find out that they often need hours in the oven!
A friend I met in Tucson happened to be an expert crème brûlée maker, and so on Saturday we set off to make a successful batch. I don't remeber the exact recipe but it was something resembling the below:
Crème brûlée 4 cups heavy whipping cream 1 vanilla bean, split 6 egg yolks 1/2 C white sugar 1/2 C brown sugar Heat the cream and split vanilla bean in a pot to a light simmer. Mix egg yolks and sugar before slowly mixing in hot cream mixture. Pour custard into ramicans. Place in a boiling water bath in a pan and heat in a 325 degree oven, covered with tin foil for 1 1/2 hours (although I wouldn't trust any time on this, check with a fork after 30-45 minutes. If placed in the custard and comes out clean, it is ready) Then let it chill in the fridge for a few hours. Once chilled, lightly cover the top with qhite sugar and caramelize with a kitchen torch (ours was out of gas, so we put them under the broiler for a minute or two until bubbly). The broiler won't give you a nice brown color, but you will still have the fun little crunch sound!


The crème brûlée was wonderful! It is great topped with berries too :)

Next was th gnocchi. As you may remeber, Rose and I attempted to make gnocchi this past summer. While it ended up delishious, the humidity of DC caused it to take 5 or so extra cups of flour and a few hours of kneading since the dough kept soaking in the moisture from the air! This time I made it in Tucson where the is no humidity and it worked out wonderfully!
Rosemary Gnocchi 4 medium potatoes 1 C flour 1 tsp salt 2 Tbsp fresh rosemary, chopped Boil the potatoes until soft (about 45 minutes). Keep the water for later use. Skin the potatoes and mash while hot. Mix in the salt and flour by hand until it becomes a dough. Kned in the fresh rosemary. Roll the dough out into 3/4" strips and cut 1 inch pieces. Boil the gnocchi in the (above) water until they float to the top, about 2 minutes. Serve with tomato sauce!


All I can say is never try to make gnocchi on the east coast during the summer! While the gnocchis tasted great before they were super-dense because all the extra flour. These were very light, fluffy, and delicious!
This was a very successful cooking-filled weekend. I overcame two of my greatest kitchen fears! Now, if only I will try the caramel sauce again...Unlikely since last time I ended up with 2 boxes of sugar down and 4 hours lost. Maybe sometime!
Saturday, October 18, 2008
Chilean Squash Casserole
Sorry for the lack of posts over the past few weeks. Work has been super-busy and I haven't had much time to cook anything special. Work has been going well though. I start interviews this coming week for the document on S. AZ's food system. I will be talking to a teacher in a school garden and a CSA in Tucson this week!
The garden is coming along pretty well. Gardening in the desert is tough work! I recently planted some kale and broccoli that was donated to us by the food bank's garden, and they are doing well. Our strawberries and sweet basil dont look like they will last much longer. The winter squash have been growing like crazy although I'm told they won't fruit since its so late in the season. Winter squash is a misnomer since they needed to be planted a few months ago. Lame.
Last night, we had a friend come over for dinner. I had some squash and corn I wanted to use before they went bad and much to my surprise, I found a delicious sounding recipe that used both of these things in the Moosewood Cookbook, one of my all-time favorites and the best veggie cook book I've ever used! The recipe below is slightly adapted.
Chilean Squash Casserole
4 Cups squash (I used 1 large butternut squash and one acorn squash)
1 Tbsp. olive oil
1 tsp. salt
1 1/2 C. chopped onion (about half of one large yellow onion)
5 medium cloves garlic, minced
black pepper, to taste
1 tsp. chili powder
2 C. corn
1 C grated cheddar cheese
1) Bake the squash in an oven at 375 degrees for about 45 minutes, or until soft. Mash in a bowl once cooked.
2) Saute the onion over medium heat for about 5 minutes in olive oil. Add salt and corn, saute for 5 more minutes.
3) Add garlic, black pepper, chili powder, and saute for a few more minutes
4) Add the sauted veggies to the squash and mix well. Spread into an ungreased 9-inch baking pan; sprinkle with grated cheddar cheese.
5) Bake uncovered for about 25 minutes, or until bubbly.
Pictures are below (they aren't the best due to lighting and my continued refusal to use a flash, but it gives you an idea!)
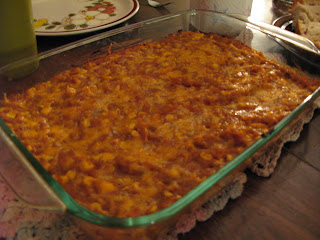

Tonight for dinner I had leftover squash casserole, but I also had an idea. I put the squash in corn tortillas and had Chilean squash tacos. So good!
The casserole (and subsequent tacos) were quite delicious and made me miss autumn terribly! It is still in the mid-90s here in Tucson. We were tricked last week when the temperature dropped to the 60s and 70s, but now its back to the heat...So it was nice to have this autumnal dish to remind me of home, the crisp weather, and the changing leaves.
Friday, October 3, 2008
Avocado Ice Cream!
Starting this past summer, I have been trying to branch out of the traditional ice cream flavor realm and move into more unique and complex flavors. My first experiment would have been the Mexican Chocolate ice cream, which isn't a new flavor by any means, but it definitely pushed the boundaries I had for what constitutes a "good" ice cream flavor. Spicy ice cream?! But it worked oh so well! With this spirit for adventure, I have felt the desire to start trying some more savory flavors. I have read about tomato and basil sorbet, garlic ice cream, and even cheddar cheese ice cream. While I'm sure I will eventually build up the courage to try those, I thought a nice stepping stone would be avocado ice cream!
Avocado is one of my absolute favorite foods. I read of avocado ice cream recipes and was always very hesitant about the idea. Avocado ice cream? Really?! Avocado has a subtle flavor and "dessert" is the last thing that comes to mind when I usually think of avocado. But avocados are relatively dirt cheap here in Arizona (compared to prices on the east coast!) and so I thought there would be no better time to try it out! I found the below recipe from my hero, Alton Brown, so I knew it was trustworthy:
Avocado Ice Cream
Ingredients:
- 12 ounces avocado meat, approximately 3 small to medium
- 1 tablespoon freshly squeezed lemon juice
- 1 1/2 cups whole milk
- 1/2 cup sugar
- 1 cup heavy cream
Peel and pit the avocados. Add the avocados, lemon juice, milk, and sugar to a blender and puree. Transfer the mixture to a medium mixing bowl, add the heavy cream and whisk to combine. Place the mixture into the refrigerator and chill until it reaches 40 degrees F or below, approximately 4 to 6 hours.
Process the mixture in an ice cream maker according to manufacturer's directions. However, this mixture sets up very fast, so count on it taking only 5 to 10 minutes to process. For soft ice cream, serve immediately. If desired, place in freezer for 3 to 4 hours for firmer texture.
To be honest, when I decided to make avocado ice cream, I thought it would be a fun novelty flavor. Little did I know that it would actually be INCREDIBLE! Even without egg yolks (which regular hungrysprout readers will know I always use 2 egg yolks in all my ice cream!) it is incredibly rich and creamy. Possibly due to the fats naturally in the avocado? And I was also surprised at the use of lemon juice, which I always knew would curdle milk. But much to my surprise, this recipe worked incredibly well. Alton was right in that it churned incredibly fast, taking only 5 minutes for me. I recommend everyone try avocado ice cream sometime in the near future. It will change your life. Or at least...no, it will basically change your life!
Saturday, September 27, 2008
Peanut Butter Ice Cream
After a rough day at the the food bank's farm, I wanted to do nothing else besides make some ice cream. I made the sorbet last week, but I haven't made an actual ice cream in weeks and was starting to go through withdrawal. That desire plus my never-ending addiction to peanut butter let to today's creation.
Peanut Butter Ice Cream
2 C heavy whiping cream
1 1/2 C whole milk
2 egg yolks
3/4 C sugar
1 tsp vanilla
1 C peanut butter
I started by making the standard ice-cream base custard (read below to the post entitled I Love Ice Cream More Than Words Can Say to get a full description of the custard-making process). While the custard was still hot, I poured it into a bowl and added the 1 cup of peanut butter and stirred until it was totally melted and uniform. I then added the heavy cream and vanilla before chilling it in the fridge and putting it in the ice cream maker.
Anyone that knows me personally knows that I live and die by crunchy peanut butter. I believe you can tell what type of person someone is by the type of peanut butter they eat. But unfortunately I had to suck it up and use creamy peanut butter in this recipe for two reasons: 1) that is all that I had enough of (the people living in this house before us left an unopened jar, whereas my crunchy peanut butter is almost gone, and 2) While I have heard that adding peanuts to the ice cream makes it amazing, I had my concerns about the churning ability of this ice cream if it had crunchy peanut butter as opposed to whole peanuts.
This ice cream is very good! After the fact I thought of the idea of making peanut butter and jelly ice cream, but that must wait until another day. I have extra cream & milk left, so be on the lookout for another ice cream in the next week or so. My inclination right now is to try out avocado ice cream, which has been on my list of flavors to try for some time now. And avocados are so cheap here compared to the east coast that I feel obligated to give it a try!
Subscribe to:
Comments (Atom)


