Sunday, October 26, 2008

The Weekend of Fixed Kitchen Disasters

I have had three major disasters in the kitchen since I started cooking: Crème brûlée, gnocchi, and caramel sauce (I don't even want to talk about that last one...) But this weekend I inadvertently tackled and defeated the first two!

I first attempted to make crème brûlée last spring at St. Mary's. I had Amish cream and organic free-range eggs from the farm, the best of the best as far as ingredients go. I followed the directions in the Joy of Cooking to a "T" and I must say that this is the only time Joy has ever failed me. The recipe said the custard was supposed to be in the oven for half an hour. Two hours later, I still had a liquid in my little mugs/make-shift ramicans (which also served as make-shift wine glasses). I was frustrated and didn't know what I did wrong so I tossed them...Only later to find out that they often need hours in the oven!

A friend I met in Tucson happened to be an expert crème brûlée maker, and so on Saturday we set off to make a successful batch. I don't remeber the exact recipe but it was something resembling the below:

Crème brûlée 4 cups heavy whipping cream 1 vanilla bean, split 6 egg yolks 1/2 C white sugar 1/2 C brown sugar Heat the cream and split vanilla bean in a pot to a light simmer. Mix egg yolks and sugar before slowly mixing in hot cream mixture. Pour custard into ramicans. Place in a boiling water bath in a pan and heat in a 325 degree oven, covered with tin foil for 1 1/2 hours (although I wouldn't trust any time on this, check with a fork after 30-45 minutes. If placed in the custard and comes out clean, it is ready) Then let it chill in the fridge for a few hours. Once chilled, lightly cover the top with qhite sugar and caramelize with a kitchen torch (ours was out of gas, so we put them under the broiler for a minute or two until bubbly). The broiler won't give you a nice brown color, but you will still have the fun little crunch sound!


The crème brûlée was wonderful! It is great topped with berries too :)


Next was th gnocchi. As you may remeber, Rose and I attempted to make gnocchi this past summer. While it ended up delishious, the humidity of DC caused it to take 5 or so extra cups of flour and a few hours of kneading since the dough kept soaking in the moisture from the air! This time I made it in Tucson where the is no humidity and it worked out wonderfully!

Rosemary Gnocchi 4 medium potatoes 1 C flour 1 tsp salt 2 Tbsp fresh rosemary, chopped Boil the potatoes until soft (about 45 minutes). Keep the water for later use. Skin the potatoes and mash while hot. Mix in the salt and flour by hand until it becomes a dough. Kned in the fresh rosemary. Roll the dough out into 3/4" strips and cut 1 inch pieces. Boil the gnocchi in the (above) water until they float to the top, about 2 minutes. Serve with tomato sauce!


All I can say is never try to make gnocchi on the east coast during the summer! While the gnocchis tasted great before they were super-dense because all the extra flour. These were very light, fluffy, and delicious!

This was a very successful cooking-filled weekend. I overcame two of my greatest kitchen fears! Now, if only I will try the caramel sauce again...Unlikely since last time I ended up with 2 boxes of sugar down and 4 hours lost. Maybe sometime!
Saturday, October 18, 2008

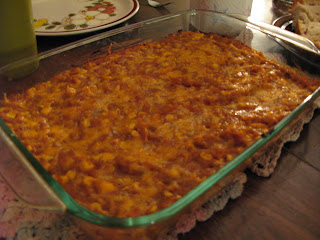
Chilean Squash Casserole

Sorry for the lack of posts over the past few weeks. Work has been super-busy and I haven't had much time to cook anything special. Work has been going well though. I start interviews this coming week for the document on S. AZ's food system. I will be talking to a teacher in a school garden and a CSA in Tucson this week!

The garden is coming along pretty well. Gardening in the desert is tough work! I recently planted some kale and broccoli that was donated to us by the food bank's garden, and they are doing well. Our strawberries and sweet basil dont look like they will last much longer. The winter squash have been growing like crazy although I'm told they won't fruit since its so late in the season. Winter squash is a misnomer since they needed to be planted a few months ago. Lame.

Last night, we had a friend come over for dinner. I had some squash and corn I wanted to use before they went bad and much to my surprise, I found a delicious sounding recipe that used both of these things in the Moosewood Cookbook, one of my all-time favorites and the best veggie cook book I've ever used! The recipe below is slightly adapted.

Chilean Squash Casserole

4 Cups squash (I used 1 large butternut squash and one acorn squash)
1 Tbsp. olive oil
1 tsp. salt
1 1/2 C. chopped onion (about half of one large yellow onion)
5 medium cloves garlic, minced
black pepper, to taste
1 tsp. chili powder
2 C. corn
1 C grated cheddar cheese

1) Bake the squash in an oven at 375 degrees for about 45 minutes, or until soft. Mash in a bowl once cooked.
2) Saute the onion over medium heat for about 5 minutes in olive oil. Add salt and corn, saute for 5 more minutes.
3) Add garlic, black pepper, chili powder, and saute for a few more minutes
4) Add the sauted veggies to the squash and mix well. Spread into an ungreased 9-inch baking pan; sprinkle with grated cheddar cheese.
5) Bake uncovered for about 25 minutes, or until bubbly.

Pictures are below (they aren't the best due to lighting and my continued refusal to use a flash, but it gives you an idea!)


Tonight for dinner I had leftover squash casserole, but I also had an idea. I put the squash in corn tortillas and had Chilean squash tacos. So good!

The casserole (and subsequent tacos) were quite delicious and made me miss autumn terribly! It is still in the mid-90s here in Tucson. We were tricked last week when the temperature dropped to the 60s and 70s, but now its back to the heat...So it was nice to have this autumnal dish to remind me of home, the crisp weather, and the changing leaves.


Friday, October 3, 2008

Avocado Ice Cream!

Starting this past summer, I have been trying to branch out of the traditional ice cream flavor realm and move into more unique and complex flavors. My first experiment would have been the Mexican Chocolate ice cream, which isn't a new flavor by any means, but it definitely pushed the boundaries I had for what constitutes a "good" ice cream flavor. Spicy ice cream?! But it worked oh so well! With this spirit for adventure, I have felt the desire to start trying some more savory flavors. I have read about tomato and basil sorbet, garlic ice cream, and even cheddar cheese ice cream. While I'm sure I will eventually build up the courage to try those, I thought a nice stepping stone would be avocado ice cream!

Avocado is one of my absolute favorite foods. I read of avocado ice cream recipes and was always very hesitant about the idea. Avocado ice cream? Really?! Avocado has a subtle flavor and "dessert" is the last thing that comes to mind when I usually think of avocado. But avocados are relatively dirt cheap here in Arizona (compared to prices on the east coast!) and so I thought there would be no better time to try it out! I found the below recipe from my hero, Alton Brown, so I knew it was trustworthy:

Avocado Ice Cream
Ingredients:
  • 12 ounces avocado meat, approximately 3 small to medium
  • 1 tablespoon freshly squeezed lemon juice
  • 1 1/2 cups whole milk
  • 1/2 cup sugar
  • 1 cup heavy cream
Directions:

Peel and pit the avocados. Add the avocados, lemon juice, milk, and sugar to a blender and puree. Transfer the mixture to a medium mixing bowl, add the heavy cream and whisk to combine. Place the mixture into the refrigerator and chill until it reaches 40 degrees F or below, approximately 4 to 6 hours.

Process the mixture in an ice cream maker according to manufacturer's directions. However, this mixture sets up very fast, so count on it taking only 5 to 10 minutes to process. For soft ice cream, serve immediately. If desired, place in freezer for 3 to 4 hours for firmer texture.

To be honest, when I decided to make avocado ice cream, I thought it would be a fun novelty flavor. Little did I know that it would actually be INCREDIBLE! Even without egg yolks (which regular hungrysprout readers will know I always use 2 egg yolks in all my ice cream!) it is incredibly rich and creamy. Possibly due to the fats naturally in the avocado? And I was also surprised at the use of lemon juice, which I always knew would curdle milk. But much to my surprise, this recipe worked incredibly well. Alton was right in that it churned incredibly fast, taking only 5 minutes for me. I recommend everyone try avocado ice cream sometime in the near future. It will change your life. Or at least...no, it will basically change your life!