Remember that time the Jews beat the Romans? That one time? Hell yeah! We take what we can get and celebrate like hell because of it! Hanukkah is that special time of year where Jewish people around the world fry anything they can get their hands on! I guess the logic is, since there isn't a scarcity of oil to light our lamps like back in the day, we should fully utilize our stock...because we can.
This is my first Hanukkah away from both my family and friends and so I wanted to make a special meal to remind me of everyone I love back at home.
Note: I hate frying. I hate it more than words can say. But there really is no other way to make latkes, so I sucked it up and, surprisingly, walked away burn free!!
Sweet Potato Latkes
(from the Moosewood Cookbook, except they call them pancakes...gentiles)
4 Cups shredded sweet potato (I only needed one large potato, but 2 mediums would work)
3 Tbsp lemon juice
1 tsp salt
black pepper, to taste
4 beaten eggs
1/3 C flour (i added a few pinches since my batter seemed a little watery)
Apple Sauce
1. Combine the ingredients in a large bowl and mix well.
2. Heat a small amount of oil (i used too much...) on a skillet until very hot. It is ready when a small dollop of batter sizzles)
3. Use a spoon to scoop out and form thin pancakes.
4. Fry in oil on both sides until golden brown.
5. Let sit on a paper towel to drain excess oil.
Eat with apple sauce and enjoy! There are some of the best latkes I've ever had, I hope you like them too!!
Sunday, December 21, 2008
Peppermint Bark Ice Cream
It was about a year ago that I bought my ice cream maker and made my first batch of ice cream! The flavor was peppermint bark and little did I know the long and crazy path of ice cream making I was getting myself into! I had some cream and milk left from my last batch and needed to use it up and decided it would be a nice yearly/holiday tradition to make peppermint bark ice cream every year around this time! My first attempt I used store-bought bark but today I decided to make my own peppermint bark!
Peppermint bark is usually quite expensive, and you can save a good amount by making it yourself! Plus, it makes a beautiful holiday gift :)
Peppermint Bark 1 bag (11.5 oz) of white chocolate chips 1 bag (11.5 oz) of dark chocolate chips (i used bittersweet, 60% cacao) 1 tsp peppermint extract 6 oz peppermint candies
1. Melt the dark chocolate over a double boiler. (To do this, heat a pot of water to a simmer and place another metal pot that fits on top but does not touch the water on top. This will prevent the chocolate from burning as it tends to do over direct heat) Pour the dark chocolate chips in and stir until completely melted. Add 1 tsp peppermint extract.
2. Pour the melted dark chocolate into a pan covered with wax or parchment paper and spread evenly. Place this in the fridge until hard, about 15-20 minutes.
3. While the dark chocolate cools, crush the peppermint candies in a plastic bag with a hammer or other blunt object. I used a meat-tenderizer...what else would I use it for!?
4. Melt the white chocolate over a double boiler and pour on top of the completely hardened dark chocolate. Top with the crushed peppermint candy and let chill in the fridge for at least an hour. Once hardened completely, take out of the fridge, lift out of the tray with the wax paper and break up into desired size pieces!


The night before I made a custard for a basic french vanilla ice cream (recipe is on this blog at least 10 times so I wont repeat it!) After chilling overnight, I churned and added crushed up peppermint bark during the last minute of churning. It then went into the freezer for at least 4 hours before I was able to enjoy it!

Tonight is the first night of Hannukah, so be on the lookout for some good ol' jewish recipes! I have a few ideas up my sleeve!
Happy Holidays everyone!!!
Wednesday, December 17, 2008
Vilsack to be Secretary of Agriculture
A few thoughts on the Secretary of Agriculture pick...
Vilsack is a huge proponent of corn ethanol, which has serious environmental and economic problems. Some studies show corn ethanol requires more energy to create per calorie that it actually releases. The plus heavy government subsidies plus, corn ethanol is one reason many believe food prices rose so dramatically in recent times...(http://www.nytimes.com/2007/09/19/opinion/19wed1.html?hp)
Vilsack is also very close to the BioTech industry and supports GMOs (genetically modified organisms) http://www.alternet.org/blogs/peek/113477/it's_vilsack:_obama_picks_pro-gmo_and_pro-biofuels_ag_secretary/
Here are a few more reasons from the Organic Consumer's Association:
http://www.organicconsumers.org/articles/article_15573.cfm
While Vilsack is decent on land conservation and some environmental issues, overall I'm pretty disappointed with Obama's choice. As I mentioned on a recent post, there were other very real alternatives. A group from the Sustainable Ag movement created this petition which lists six highly qualified alternatives, and they received over 54,000 signatures in only a few weeks: http://www.fooddemocracynow.org/. I guess we will see how he does, but my initial reaction was something like "change?! what change is that?!" Hopefully he won't be more of the same pro-agribusiness as we've for decades, although his record doesn't seem to give signs he is going to be any real change we can believe in.
Here is an online petition by the Organic Consumer's Association opposing Vilsack's nomination:
http://salsa.democracyinaction.org/o/642/petition.jsp?petition_KEY=1783
Thoughts?
Meat Consumption and the Climate Crisis
Below is a wonderful article from the New York Times about the direct link between meat consumption and the climate crisis. Everyone should read this article when they get a chance. Reducing meat consumption in your diet reduces more greenhouse gases than changing your car to a Toyota Prius!
http://www.nytimes.com/2008/12/04/science/earth/04meat.html?_r=1&scp=1&sq=as%20more%20eat%20meat&st=cse
http://www.nytimes.com/2008/12/04/science/earth/04meat.html?_r=1&scp=1&sq=as%20more%20eat%20meat&st=cse
Tuesday, December 16, 2008
Demand Sustainable Agriculture from Obama!
A wonderful petition is going around the internet, organized by organic farmers, chefs, and policymakers. It asks President-Elect Obama to appoint a Secretary of Agriculture who will focus on sustainable agriculture, not a perpetuation of the current industrial mindset that has run ag policy in this country for decades! Please sign if you can!
http://www.fooddemocracynow.org/
Also, on a somewhat related note, below is an open letter from amazing poet Wendell Berry & environmental activist/author Bill McKibben asking people to join them in DC in early march in engage in a peaceful act of civil disobedience against a coal plant. Please read:
http://www.huffingtonpost.com/michael-brune/wendell-berry-and-bill-mc_b_149948.html?view=print
Saturday, December 6, 2008
Honey Almond Fig-Swirl Ice Cream
It has been on my list since the summer, and this weekend I finally made my honey, fig, and almond ice cream. This is probably my most "gourmet" ice cream to date and has definitely taken the longest to make.

I started by honey roasting the almonds. I had a little more than a half a cup of organic slivered almonds, and placed them in a 350 degree oven until they turned slightly brown. While they were baking, I mixed together 1/2 Tbsp water, 1/2 Tbsp honey, and 1/2 Tbsp veggie oil. I brought there to a slight simmer and mixed in the almonds right after they came out of the oven. I then stirred the almonds for a few minutes until all the liquid was gone and laid them out to cool on a piece of foil.

I was mixed about how to include the figs. I couldn't find any fresh figs due to the season, so settled for organic dried figs. I was going to cut them up into little pieces and throw them in with the almonds but wasn't sure if the fig flavor would come out this way. I decided on making a fig-cinnamon jam that would then be swirled into the honey ice cream with almonds about half-way through freezing like I had done once while making white chocolate raspberry-swirl ice cream. This would not only help make sure there is plenty of amazing fig flavor in each scoop, it would also look pretty awesome! I cut about 15 dried figs into quarters and mixed them in a pot with 1 C water (much more water had to be added throughout cooking to fully rehydrate the fruit), a couple tablespoons of lemon juice, and 3/4 cup sugar. This cooked over medium heat for a good while (45 minutes or so) until the figs completely broke down and made a nice jam consistency. To help break down the tough skins, I used a potato masher. The fig jam cooled in the fridge overnight.

Next came the ice cream! I used my standard recipe for the ice cream base but substituted honey for sugar and reduced the amount by about 1/8th of a cup since I didn't want the honey flavor to cover up the almond and fig.

Honey Ice Cream
2 C heavy whipping cream
1 1/2 C whole milk
2 egg yolks
5/8 C honey
1/8 tsp salt
2 tsp vanilla
I heated 1 1/2 C whole milk and 5/8 C honey over low hear, stirring until the honey dissolves. Then, I temper the egg yolks into the cream mixture by slowly adding about 1/2 C of the hot mixture into the eggs before pouring the whole thing back into the pot. Next, I stirred the mixture constantly until it reached about 175 degrees and was thick enough to cover the back of a wooden spoon. Once at this stage, I took the custard off the heat and let it cool down for about 1/2 an hour before adding the 2 C cream and vanilla. The custard went into the fridge witha piece of plastic wrap directly on top of the cream to prevent a skin from forming.
The next morning I anxiously put the honey custard into the ice cream maker. After about 10 minutes, the ice cream was almost done and I added the honey roasted almonds and let it church for about 30 seconds.
I was torn about how exactly to add the fig jam. I wanted it to kind of swirl through the ice cream and have heard of two methods of doing this. The first is to freeze the ice cream in the freezer for a few hours, then add the jam and swirl it with a knife. The second is to add the jam into the ice cream mixer the last few seconds and let it churn before freezing completely. I didn't want the jam to completely fall apart and blend completely in the ice cream since I wanted the honey ice cream flavor to still shine through. Even so, I added dollops of jam to the cream during the last few seconds of churning. The jam did spread out through the ice cream pretty consistently, but my worries were unfounded. I tried a little before putting it in the freezer and the flavor was out of this world! The honey, honey roasted almonds, and cinnamon-fig jam could each be tasted a little on their own but blend into a wonderful ice cream.


By far, this is one of my biggest ice cream successes to date! I guess the 4 or so hours of prep time payed off!
Monday, December 1, 2008
No Thanksgiving recipes?!
Fail. I wasn't able to cook anything for Thanksgiving. But I have a good reason! I flew home from Tucson to be with the family for the holiday and didn't land in Baltimore until about an hour and a half before Thanksgiving dinner. Even so, it was incredibly delicious! Who says vegetarians can't eat well on Thanksgiving?! My step-mother made a sweet potato casserole that was literally heavenly. There were a few veggie casseroles and about 4 types of stuffing. For dessert there was four types of pie. This is why Thanksgiving is my absolute favorite holiday of all time. During the weekend I walked around Williams-Sonoma and Crate & Barrel with Rose and it took every ounce of self control to not buy anything in the store...thankfully I walked away and didn't spend my life savings.
What were some favorite thanksgiving dishes this year??
I will be back soon enough with some more food! On the way: honey fig ice cream with toasted almond! (this has been on my ice cream to-do list for some time, so I really hope this actually happens soon!)
What were some favorite thanksgiving dishes this year??
I will be back soon enough with some more food! On the way: honey fig ice cream with toasted almond! (this has been on my ice cream to-do list for some time, so I really hope this actually happens soon!)
Thursday, November 13, 2008
Mesquite Chocolate Chip Cookies
This weekend I am flying out to Austin, TX for the fellowship mid-field retreat. There we will get to see our fellow fellows, decompress from our experiences so far, continue some conversations that were started during training in September, plan ahead, and hopefully relax some as well! It is really hard to believe that the first half of the field placement has gone by!
We were asked to bring in something (creative) to help describe our life in our field placements. After much brainstorming (although it seems obvious at the time) I decided to bake something! I thought it would be great to use an ingredient that is pretty special to Tucson and I decided on mesquite flour. The mesquite tree grows throughout the Southwest and is everywhere in Tucson! It had pods that can be ground up into flour. Thankfully, our Mennonite friends had some extra mesquite flour lying around and I found this amazing recipe online! (it was from a random google search and I don't remember exactly where it was from, sorry!)
Mesquite Chocolate Chip Cookies
2 1/2 cups whole-wheat pastry flour
1 cup mesquite flour, sifted if clumpy
1 teaspoon baking soda
1 teaspoon baking powder
3/4 teaspoon fine-grain sea salt
1 cup unsalted butter, at room temperature
2 cups natural cane sugar
3 large eggs
1 tablespoon pure vanilla extract
2 cups rolled oats
2 cups semisweet chocolate chips
Preheat the oven to 375°F, position the racks in the upper half of the oven, and line 2 baking sheets with parchment paper.
Whisk together the flours, baking soda, baking powder, and salt in a bowl. Set aside.
In a large bowl or stand mixer, beat the butter until light and fluffy, then beat in the sugar until of a consistency like thick frosting. Beat in the eggs one at a time, incorporating each fully before adding the next and scraping down the sides of the bowl a few times. Stir in the vanilla until evenly incorporated. Add the dry ingredients in 3 increments, stirring between each addition. At this point, you should have a moist, uniformly brown dough. Stir in the oats and chocolate
chips by hand, mixing only until evenly distributed.
Drop 2 tablespoons of dough for each cookie onto the prepared baking sheets 2 inches apart and bake for about 10 minutes, until golden on both top and bottom. Don’t overbake these; if anything, underbake them. Cool on wire racks.
Makes 2 to 3 dozen chunky, medium-large cookies.
The mesquite flour has a nice sweet and grainy taste to it, unlike any other flour I have ever had. It adds a really nice texture and flavor to these amazing cookies (it is also supposedly very good for you too!) I was unsure how all whole-wheat and mesquite cookies would turn out but I guess that ton of butter and sugar helps out! Hopefully they will be a hit with my fellow fellows!
There is a great group here in Tucson called Desert Harvesters, that has it's own mill and travels around Southern Arizona so people can mill their own mesquite pods. This is a really great thing because not only are people exposed to a healthy, incredibly local food (right from their backyard!), it has also been a way for people who have trouble affording healthy food to help feed themselves and maybe make a little extra income by selling the flour to their friends and neighbors.
My actual work at the Community Food Bank for the fellowship has been going great (and slightly exhausting) I have been traveling all around town (Phoenix 3 times in the last week!!) interviewing people for the document I am helping to write on Southern Arizona's local food system. I am focusing specifically on sustainable agriculture & government and community responses to hunger. I have interviewed tons of people already, including someone from Desert Harvesters, two organic farmers, a State Representative, someone from a WIC clinic, a teacher at a school garden, and many others. My job basically consists of talking to amazing, talented, bright people with tons of experience, learn from them, and write about it to share with the community. I can't really think of a better job than that! I expect the interviews to come to a close soon and then the writing will begin. If anyone is interested in reading what I write as it comes along, let me know. I will need editors!!
Tuesday, November 11, 2008
Pumpkin Pancakes & Apple Cider Syrup
I think I have mentioned how terribly I am missing autumn before. I miss the cool breeze, the changing leaves, and the smell of cinnamon, nutmeg, ginger, and cloves. Thankfully I have access to the spices since the first two are impossible to buy in the desert.
I had some extra pumpkin and had this urge to make pumpkin pancakes for a while, so on Sunday morning I made them for our lovely wonderful guests from CA! The recipe is from allrecipes.com, (one of the best recipe sites, btw!) To top off this delicious breakfast, I threw together an amazing apple cider syrup.
Pumpkin Pancakes
Ingredients
Directions
The pancakes were wonderful and fluffy. I was unsure what the wheat flour and pumpkin would do to the texture but they turned our really well. The pumpkin pancakes weren't very sweet so it was a good thing we had the syrup on hand! The combination of pumpkin, spices, and apple cider was really amazing. Expect some more pumpkin/apple cider combinations in the future!
I had some extra pumpkin and had this urge to make pumpkin pancakes for a while, so on Sunday morning I made them for our lovely wonderful guests from CA! The recipe is from allrecipes.com, (one of the best recipe sites, btw!) To top off this delicious breakfast, I threw together an amazing apple cider syrup.
Pumpkin Pancakes
Ingredients
- 2 cups all-purpose flour (I used 1/2 whole wheat flour)
- 3 tablespoons brown sugar
- 2 teaspoons baking powder
- 1 teaspoon baking soda
- 1 teaspoon ground allspice
- 1 teaspoon ground cinnamon
- 1/2 teaspoon ground ginger
- 1/2 teaspoon salt
- 1 1/2 cups milk
- 1 cup pumpkin puree
- 1 egg
- 2 tablespoons vegetable oil
- 2 tablespoons vinegar
Directions
- In a separate bowl, mix together the milk, pumpkin, egg, oil and vinegar. Combine the flour, brown sugar, baking powder, baking soda, allspice, cinnamon, ginger and salt, stir into the pumpkin mixture just enough to combine.
- Heat a lightly oiled griddle or frying pan over medium high heat. Pour or scoop the batter onto the griddle, using approximately 1/4 cup for each pancake. Brown on both sides and serve hot.
The pancakes were wonderful and fluffy. I was unsure what the wheat flour and pumpkin would do to the texture but they turned our really well. The pumpkin pancakes weren't very sweet so it was a good thing we had the syrup on hand! The combination of pumpkin, spices, and apple cider was really amazing. Expect some more pumpkin/apple cider combinations in the future!
Sunday, November 2, 2008
Wine Tasting & Pumpkin Carving
Yesterday afternoon/night my friend Carmen & I went wine tasting in Tucson! We heard of one place from a friend, but when I looked online I could find nothing about it. But fate was on our side when I found out about a "Spooky Halloween Treats" tasting at CataVinos. How could you not go to that?! The owner, Yvonne, was amazingly kind and taught us all about how to taste wine and the reasons for doing the certain things. Like, did you know that when you swirl a glass of wine counter-clockwise you can smell the alcohol more, but if you go clockwise you can smell the fruit? I didn't believe it at all until I tried it, and whoah! Its crazy but true! The wine names and/or labels were all "spooky" in nature, like "Big Red Monster," or "Evil," and a reisling in a bottle the shape of a black cat! They were all delicious and I plan on going back there at least a few more times before I head back east!
So, I officially cant do anything political because of the fellowship, which is funded by the Congress in the Farm Bill. But I will just post this picture of a pumpkin I "found" (and..umm...didnt carve, thanks to the help of www.yeswecarve.com) because I thought it was awesome..and I will...umm...post a McCain pumpkin as soon as I find one...to be..fair and balanced? Yeah, thats it! On a completely unrelated note and an entirely different pumpkin! I baked the seeds with cinnamon and brown sugar, and saved some others for planting next year in DC!


So, I officially cant do anything political because of the fellowship, which is funded by the Congress in the Farm Bill. But I will just post this picture of a pumpkin I "found" (and..umm...didnt carve, thanks to the help of www.yeswecarve.com) because I thought it was awesome..and I will...umm...post a McCain pumpkin as soon as I find one...to be..fair and balanced? Yeah, thats it! On a completely unrelated note and an entirely different pumpkin! I baked the seeds with cinnamon and brown sugar, and saved some others for planting next year in DC!


Sunday, October 26, 2008
The Weekend of Fixed Kitchen Disasters
I have had three major disasters in the kitchen since I started cooking: Crème brûlée, gnocchi, and caramel sauce (I don't even want to talk about that last one...) But this weekend I inadvertently tackled and defeated the first two!
I first attempted to make crème brûlée last spring at St. Mary's. I had Amish cream and organic free-range eggs from the farm, the best of the best as far as ingredients go. I followed the directions in the Joy of Cooking to a "T" and I must say that this is the only time Joy has ever failed me. The recipe said the custard was supposed to be in the oven for half an hour. Two hours later, I still had a liquid in my little mugs/make-shift ramicans (which also served as make-shift wine glasses). I was frustrated and didn't know what I did wrong so I tossed them...Only later to find out that they often need hours in the oven!
A friend I met in Tucson happened to be an expert crème brûlée maker, and so on Saturday we set off to make a successful batch. I don't remeber the exact recipe but it was something resembling the below:
Crème brûlée 4 cups heavy whipping cream 1 vanilla bean, split 6 egg yolks 1/2 C white sugar 1/2 C brown sugar Heat the cream and split vanilla bean in a pot to a light simmer. Mix egg yolks and sugar before slowly mixing in hot cream mixture. Pour custard into ramicans. Place in a boiling water bath in a pan and heat in a 325 degree oven, covered with tin foil for 1 1/2 hours (although I wouldn't trust any time on this, check with a fork after 30-45 minutes. If placed in the custard and comes out clean, it is ready) Then let it chill in the fridge for a few hours. Once chilled, lightly cover the top with qhite sugar and caramelize with a kitchen torch (ours was out of gas, so we put them under the broiler for a minute or two until bubbly). The broiler won't give you a nice brown color, but you will still have the fun little crunch sound!


The crème brûlée was wonderful! It is great topped with berries too :)

Next was th gnocchi. As you may remeber, Rose and I attempted to make gnocchi this past summer. While it ended up delishious, the humidity of DC caused it to take 5 or so extra cups of flour and a few hours of kneading since the dough kept soaking in the moisture from the air! This time I made it in Tucson where the is no humidity and it worked out wonderfully!
Rosemary Gnocchi 4 medium potatoes 1 C flour 1 tsp salt 2 Tbsp fresh rosemary, chopped Boil the potatoes until soft (about 45 minutes). Keep the water for later use. Skin the potatoes and mash while hot. Mix in the salt and flour by hand until it becomes a dough. Kned in the fresh rosemary. Roll the dough out into 3/4" strips and cut 1 inch pieces. Boil the gnocchi in the (above) water until they float to the top, about 2 minutes. Serve with tomato sauce!


All I can say is never try to make gnocchi on the east coast during the summer! While the gnocchis tasted great before they were super-dense because all the extra flour. These were very light, fluffy, and delicious!
This was a very successful cooking-filled weekend. I overcame two of my greatest kitchen fears! Now, if only I will try the caramel sauce again...Unlikely since last time I ended up with 2 boxes of sugar down and 4 hours lost. Maybe sometime!
Saturday, October 18, 2008
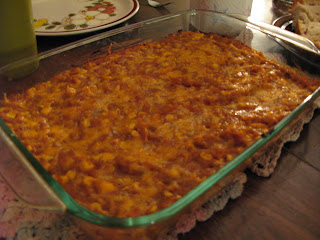
Chilean Squash Casserole
Sorry for the lack of posts over the past few weeks. Work has been super-busy and I haven't had much time to cook anything special. Work has been going well though. I start interviews this coming week for the document on S. AZ's food system. I will be talking to a teacher in a school garden and a CSA in Tucson this week!
The garden is coming along pretty well. Gardening in the desert is tough work! I recently planted some kale and broccoli that was donated to us by the food bank's garden, and they are doing well. Our strawberries and sweet basil dont look like they will last much longer. The winter squash have been growing like crazy although I'm told they won't fruit since its so late in the season. Winter squash is a misnomer since they needed to be planted a few months ago. Lame.
Last night, we had a friend come over for dinner. I had some squash and corn I wanted to use before they went bad and much to my surprise, I found a delicious sounding recipe that used both of these things in the Moosewood Cookbook, one of my all-time favorites and the best veggie cook book I've ever used! The recipe below is slightly adapted.
Chilean Squash Casserole
4 Cups squash (I used 1 large butternut squash and one acorn squash)
1 Tbsp. olive oil
1 tsp. salt
1 1/2 C. chopped onion (about half of one large yellow onion)
5 medium cloves garlic, minced
black pepper, to taste
1 tsp. chili powder
2 C. corn
1 C grated cheddar cheese
1) Bake the squash in an oven at 375 degrees for about 45 minutes, or until soft. Mash in a bowl once cooked.
2) Saute the onion over medium heat for about 5 minutes in olive oil. Add salt and corn, saute for 5 more minutes.
3) Add garlic, black pepper, chili powder, and saute for a few more minutes
4) Add the sauted veggies to the squash and mix well. Spread into an ungreased 9-inch baking pan; sprinkle with grated cheddar cheese.
5) Bake uncovered for about 25 minutes, or until bubbly.
Pictures are below (they aren't the best due to lighting and my continued refusal to use a flash, but it gives you an idea!)

Tonight for dinner I had leftover squash casserole, but I also had an idea. I put the squash in corn tortillas and had Chilean squash tacos. So good!
The casserole (and subsequent tacos) were quite delicious and made me miss autumn terribly! It is still in the mid-90s here in Tucson. We were tricked last week when the temperature dropped to the 60s and 70s, but now its back to the heat...So it was nice to have this autumnal dish to remind me of home, the crisp weather, and the changing leaves.
The garden is coming along pretty well. Gardening in the desert is tough work! I recently planted some kale and broccoli that was donated to us by the food bank's garden, and they are doing well. Our strawberries and sweet basil dont look like they will last much longer. The winter squash have been growing like crazy although I'm told they won't fruit since its so late in the season. Winter squash is a misnomer since they needed to be planted a few months ago. Lame.
Last night, we had a friend come over for dinner. I had some squash and corn I wanted to use before they went bad and much to my surprise, I found a delicious sounding recipe that used both of these things in the Moosewood Cookbook, one of my all-time favorites and the best veggie cook book I've ever used! The recipe below is slightly adapted.
Chilean Squash Casserole
4 Cups squash (I used 1 large butternut squash and one acorn squash)
1 Tbsp. olive oil
1 tsp. salt
1 1/2 C. chopped onion (about half of one large yellow onion)
5 medium cloves garlic, minced
black pepper, to taste
1 tsp. chili powder
2 C. corn
1 C grated cheddar cheese
1) Bake the squash in an oven at 375 degrees for about 45 minutes, or until soft. Mash in a bowl once cooked.
2) Saute the onion over medium heat for about 5 minutes in olive oil. Add salt and corn, saute for 5 more minutes.
3) Add garlic, black pepper, chili powder, and saute for a few more minutes
4) Add the sauted veggies to the squash and mix well. Spread into an ungreased 9-inch baking pan; sprinkle with grated cheddar cheese.
5) Bake uncovered for about 25 minutes, or until bubbly.
Pictures are below (they aren't the best due to lighting and my continued refusal to use a flash, but it gives you an idea!)


Tonight for dinner I had leftover squash casserole, but I also had an idea. I put the squash in corn tortillas and had Chilean squash tacos. So good!
The casserole (and subsequent tacos) were quite delicious and made me miss autumn terribly! It is still in the mid-90s here in Tucson. We were tricked last week when the temperature dropped to the 60s and 70s, but now its back to the heat...So it was nice to have this autumnal dish to remind me of home, the crisp weather, and the changing leaves.
Friday, October 3, 2008
Avocado Ice Cream!
Starting this past summer, I have been trying to branch out of the traditional ice cream flavor realm and move into more unique and complex flavors. My first experiment would have been the Mexican Chocolate ice cream, which isn't a new flavor by any means, but it definitely pushed the boundaries I had for what constitutes a "good" ice cream flavor. Spicy ice cream?! But it worked oh so well! With this spirit for adventure, I have felt the desire to start trying some more savory flavors. I have read about tomato and basil sorbet, garlic ice cream, and even cheddar cheese ice cream. While I'm sure I will eventually build up the courage to try those, I thought a nice stepping stone would be avocado ice cream!
Avocado is one of my absolute favorite foods. I read of avocado ice cream recipes and was always very hesitant about the idea. Avocado ice cream? Really?! Avocado has a subtle flavor and "dessert" is the last thing that comes to mind when I usually think of avocado. But avocados are relatively dirt cheap here in Arizona (compared to prices on the east coast!) and so I thought there would be no better time to try it out! I found the below recipe from my hero, Alton Brown, so I knew it was trustworthy:
Avocado Ice Cream
Ingredients:
- 12 ounces avocado meat, approximately 3 small to medium
- 1 tablespoon freshly squeezed lemon juice
- 1 1/2 cups whole milk
- 1/2 cup sugar
- 1 cup heavy cream
Peel and pit the avocados. Add the avocados, lemon juice, milk, and sugar to a blender and puree. Transfer the mixture to a medium mixing bowl, add the heavy cream and whisk to combine. Place the mixture into the refrigerator and chill until it reaches 40 degrees F or below, approximately 4 to 6 hours.
Process the mixture in an ice cream maker according to manufacturer's directions. However, this mixture sets up very fast, so count on it taking only 5 to 10 minutes to process. For soft ice cream, serve immediately. If desired, place in freezer for 3 to 4 hours for firmer texture.
To be honest, when I decided to make avocado ice cream, I thought it would be a fun novelty flavor. Little did I know that it would actually be INCREDIBLE! Even without egg yolks (which regular hungrysprout readers will know I always use 2 egg yolks in all my ice cream!) it is incredibly rich and creamy. Possibly due to the fats naturally in the avocado? And I was also surprised at the use of lemon juice, which I always knew would curdle milk. But much to my surprise, this recipe worked incredibly well. Alton was right in that it churned incredibly fast, taking only 5 minutes for me. I recommend everyone try avocado ice cream sometime in the near future. It will change your life. Or at least...no, it will basically change your life!
Saturday, September 27, 2008
Peanut Butter Ice Cream
After a rough day at the the food bank's farm, I wanted to do nothing else besides make some ice cream. I made the sorbet last week, but I haven't made an actual ice cream in weeks and was starting to go through withdrawal. That desire plus my never-ending addiction to peanut butter let to today's creation.
Peanut Butter Ice Cream
2 C heavy whiping cream
1 1/2 C whole milk
2 egg yolks
3/4 C sugar
1 tsp vanilla
1 C peanut butter
I started by making the standard ice-cream base custard (read below to the post entitled I Love Ice Cream More Than Words Can Say to get a full description of the custard-making process). While the custard was still hot, I poured it into a bowl and added the 1 cup of peanut butter and stirred until it was totally melted and uniform. I then added the heavy cream and vanilla before chilling it in the fridge and putting it in the ice cream maker.
Anyone that knows me personally knows that I live and die by crunchy peanut butter. I believe you can tell what type of person someone is by the type of peanut butter they eat. But unfortunately I had to suck it up and use creamy peanut butter in this recipe for two reasons: 1) that is all that I had enough of (the people living in this house before us left an unopened jar, whereas my crunchy peanut butter is almost gone, and 2) While I have heard that adding peanuts to the ice cream makes it amazing, I had my concerns about the churning ability of this ice cream if it had crunchy peanut butter as opposed to whole peanuts.
This ice cream is very good! After the fact I thought of the idea of making peanut butter and jelly ice cream, but that must wait until another day. I have extra cream & milk left, so be on the lookout for another ice cream in the next week or so. My inclination right now is to try out avocado ice cream, which has been on my list of flavors to try for some time now. And avocados are so cheap here compared to the east coast that I feel obligated to give it a try!
Monday, September 22, 2008
Prickly Pear Sorbet!
Internet has been installed in my house and I am back in business! Thanks for your patience, friends.
When I found out that I was moving to Tucson for my fellowship placement, one of the first things I thought of was how awesome it would be to make prickly pear sorbet. I shipped my ice cream maker all the way across the country with this idea in mind. When I landed last week and asked where I could find prickly pear cactus fruit, I was informed that most of the cacti around stopped producing fruit the week before. My dreams quickly came crashing down on me inside an hour of landing! I kept my eye out for some prickly pear fruits but none could be found.
Last week, Raquel (my field site partner) and I went to our Mennonite Volunteer Service (MVS) friend's house for dinner. They told me that their prickly pear cactus had fruit left, but when I went out to check they had all been harvested earlier in the day. Again, my plan had been foiled! So I asked if they knew of anywhere that still had some fruit growing and I was informed that the gas station by my house had tons left.
So I left the MVS house complete with a bucket and tongs in hand (the fruit has tiny thorns on its skin so you can't pick them with your bare hands) in the middle of the night (actually more like 8:30, but it was dark out and I was still on east coast time). And much to my delight, there were hundreds if not thousands of prickly pear fruits growing all over the cacti in the gas station parking lot! And we harvested those fruits like crazy...almost an entire bucket full!

Now to make the sorbet. I had to run each fruit under cold water and wipe the thorns off while wearing a rubber glove and then again into a dish towel. Once that was done, I cut a half inch slit into the skin length wise on one side and peeled the rest of the skin away.

The fruit was then thrown into the blender and then the seeds and flesh were strained out, leaving only the juice. I took a half cup of the juice and put it in a pot with 1 cup of sugar and heated it for about 10 minutes to make a simple syrup. The syrup was then mixed back in with the rest of the juice with a splash of orange juice (since I didn't have lemon juice which is usually added to sorbets to help with the flavor), chilled, and then went to freeze in the mixer.
The sorbet has a a very unique taste. The fruit itself has very little flavor so the sugar and orange juice helped a lot. Te taste really can't be compared to anything I have ever had. It is sweet and tart. The only bad thing is that it leaves a funky aftertaste in your mouth. But it is such a gorgeous color!

On another note, the garden we planted is coming along well. Much was added since my post last week. We now have three types of basil (sweet, lemon, and thai), rosemary,sage, two strawberry plants, a habanero pepper, and 5 green bell pepper plants. Our onion seeds started sprouting today, which is so exciting, along with some mesclun and winter squash. There are also carrot, cilantro, parsley, chives, spinach, kale, sugar snap peas, and a few other seeds we are waiting to sprout.
My field placement for the fellowship is at the Community Food Bank here in Tucson. This food bank is so amazing and incredibly progressive in the field! They don't only pass out emergency food boxes, but they have their own farm which grows for their own farmers markets, garden classes, home garden instruction, and little grocery store, and so much more. I am working in the Community Food Security Center and most of my work will involve promoting all of the amazing work of the Center and creating a publication about the southern Arizona food system to show people how their food choices have a large impact on the community around them. Before starting on my project, though, I have been working all around the food bank to get a better understanding of how all their programs work. I am also working with Raquel on a project to show people just how much food can be bought with a $10 voucher at the food store and recipes they can use with those food lists.
So overall, things are amazing here in Tucson. I miss my family and friends so much, but I have never felt like I am in the right place as much as I do now. I know that I will be doing work that will help the Commuity Food Security Center, the food bank, and the community around me while giving me such invaluable experience. I know that I have learned an unbelievable amount during the week and a half of training and my week here in Tucson. I am looking forward to seeing what else I will learn over the next 5 months!
So, does anybody have any ice cream flavor ideas? Let me know in the comments!!
Thanks for reading and thanks for your patience while I was training/moving/getting settled/getting internet!
-Eric
Monday, September 15, 2008
Pictures of my Tucson House
There hasn't been any time for cooking yet, but I was able to upload a few pictures of my new house. They can be viewed from the link below:
http://www.flickr.com/photos/tyrannyofdistance/sets/72157607306017688/
My favorite part is the huge kitchen! (compared to any previous kitchen I've cooked in before). Raquel, my housemate & fellow fellow, and I also planted a little herb garden this morning complete with thai basil, lemon basil, sage, and rosemary. The soil is so dry here, but we will water them tons and hope they survive!
Be back again soon!
-eric
Sunday, September 14, 2008
Alive & in Tucson
Hello friends! I am alive and well. Fellowship training was intense but amazing and I made it safely to Tucson, AZ yesterday afternoon. My house does not have internet (although it has a HUGE amazing kitchen) so posts will continue to be infrequent until I get that fixed. I am currently using the free wi-fi at Safeway, which is not the ideal place to get work done on the internet...but alas.
What have people been cooking themselves Post recipes!
I shall return ASAP.
What have people been cooking themselves Post recipes!
I shall return ASAP.
Tuesday, September 2, 2008
Slow on the Posts (+ Cinnamon Ice Cream)
The recent lack of cooking posts on Hungry Sprout will continue for about two weeks. This past week I went to the beach, visited St. Mary's, and have been packing for training in DC and the move to Tucson!
I did manage to make cinnamon ice cream a few days ago, which turned out incredible well. Simply add 2-3 teaspoons of ground cinnamon to the ice cream custard once take it off the heat and add the cream (see the french vanilla ice cream recipe below). Sorry for a lack of full directions.
So I am off for fellowship training this afternoon and won't be able to cook again until I get settled in Tucson. But I will have my computer and will try to update while at training if I learn anything interesting!
Wish me luck!
Sunday, August 17, 2008
Mango Saffron Ice Cream & Peach Pie
As promised, I have made an ice cream flavor recommended by a reader! Thanks to a comment posted by “bite me,” I made mango saffron ice cream yesterday to give to a friend as a graduation gift. As with all my ice creams, I used my standard recipe for French vanilla while making a few changes.
I started by bringing 1½ C milk to a simmer with about ¼ teaspoon of saffron. Once small bubbles started to appear, to took the pot off the heat and let the saffron steep for 30 minutes.
Next, I strained the saffron out of the milk and continued with the rest of the recipe. I added ¾ C sugar to the milk and brought this back to a simmer. I then tempered in two egg yolks and stirred for about 10 minutes, until a thick custard was formed. The custard was then put in the fridge to cool for a few minutes.
Meanwhile, I cut and pureed two mangos. Once the custard had cooled some, I added two cups of heavy whipping cream and stirred in the mango puree. This mixture was then placed in the fridge to cool for a few hours before placing it in the ice cream maker for 15 minutes.
I was unsure how this recipe would work out and was pleasantly surprised at how well it turned out! You first taste the mango by itself, and then slowly the saffron comes in at the end. Both flavors are very subtle and nice. This ice cream mixes a pleasant amount of sweetness from the mango and savory from the saffron to create a unique and incredibly enjoyable dessert. Thanks so much to “bite me” for the recommendation!
That same afternoon I made a peach pie to bring to a dinner party at night. The recipe I used from the Joy of Cooking (a.k.a. the Bible) called for homemade pie dough for the crust. Normally, I avoid store-bought dough at all costs, but do to a lack of time (and a lack of shortening, which is required for any successful pie crust that is both soft and flaky, thank you Alton Brown) I bought a box of two rolls of pie crust. The recipe is as follows, changed slightly from the original to match my adjustments:
Peach Pie
Line a 9-inch pie pan with:
1 rolled out pie dough (store bought or home-made)
Preheat the oven to 425º F.
Peel, pit, and slice ¼ inch thick:
2 ½ pounds peaches (6 peaches for me)
Combine in a bowl with:
½ C sugar
3 Tbsp all-purpose flour
3 Tbsp lemon juice
1/8 teaspoon salt
Let stand for 15 minutes, stirring occasionally. Pout the filling into the bottom crust and dot with:
2 Tbsp unsalted butter, cut into small pieces
Cover the pie with a lattice made from a second piece of rolled out pie dough. Lightly brush this top crust with:
Milk
Sprinkle with:
2 Tbsp sugar
Bake about 55 minutes. Cool completely on a rack.
The pie was incredible and was better than any store-bought peach pie I have ever had. Making the lattice was easy, and was simply done by cutting strips about an inch thick out of rolled out pie dough, laying about half horizontally and then covering those with the other strips vertically. Brushing the top with milk definitely gave the pie a gorgeous golden brown color. Pictures are below!


I started by bringing 1½ C milk to a simmer with about ¼ teaspoon of saffron. Once small bubbles started to appear, to took the pot off the heat and let the saffron steep for 30 minutes.

Next, I strained the saffron out of the milk and continued with the rest of the recipe. I added ¾ C sugar to the milk and brought this back to a simmer. I then tempered in two egg yolks and stirred for about 10 minutes, until a thick custard was formed. The custard was then put in the fridge to cool for a few minutes.
Meanwhile, I cut and pureed two mangos. Once the custard had cooled some, I added two cups of heavy whipping cream and stirred in the mango puree. This mixture was then placed in the fridge to cool for a few hours before placing it in the ice cream maker for 15 minutes.
I was unsure how this recipe would work out and was pleasantly surprised at how well it turned out! You first taste the mango by itself, and then slowly the saffron comes in at the end. Both flavors are very subtle and nice. This ice cream mixes a pleasant amount of sweetness from the mango and savory from the saffron to create a unique and incredibly enjoyable dessert. Thanks so much to “bite me” for the recommendation!
That same afternoon I made a peach pie to bring to a dinner party at night. The recipe I used from the Joy of Cooking (a.k.a. the Bible) called for homemade pie dough for the crust. Normally, I avoid store-bought dough at all costs, but do to a lack of time (and a lack of shortening, which is required for any successful pie crust that is both soft and flaky, thank you Alton Brown) I bought a box of two rolls of pie crust. The recipe is as follows, changed slightly from the original to match my adjustments:
Peach Pie
Line a 9-inch pie pan with:
1 rolled out pie dough (store bought or home-made)
Preheat the oven to 425º F.
Peel, pit, and slice ¼ inch thick:
2 ½ pounds peaches (6 peaches for me)
Combine in a bowl with:
½ C sugar
3 Tbsp all-purpose flour
3 Tbsp lemon juice
1/8 teaspoon salt
Let stand for 15 minutes, stirring occasionally. Pout the filling into the bottom crust and dot with:
2 Tbsp unsalted butter, cut into small pieces
Cover the pie with a lattice made from a second piece of rolled out pie dough. Lightly brush this top crust with:
Milk
Sprinkle with:
2 Tbsp sugar
Bake about 55 minutes. Cool completely on a rack.
The pie was incredible and was better than any store-bought peach pie I have ever had. Making the lattice was easy, and was simply done by cutting strips about an inch thick out of rolled out pie dough, laying about half horizontally and then covering those with the other strips vertically. Brushing the top with milk definitely gave the pie a gorgeous golden brown color. Pictures are below!


Monday, August 11, 2008
Sushi Party!
The last piece of meat I have ever eaten was sushi in Kobe, Japan. I thought it would be the most ceremonious way to end my carnivorous career and indeed eating raw octopus and some other unidentified raw fish (I can only hope they were some kind of sea creature) was an experience! I had always been a huge fan of sushi before, my favorite being shrimp tempura. In fact, shrimp tempura is one of the only meat-filled foods I ever crave anymore. I do love veggie sushi, particularly avocado rolls and asparagus tempura rolls, but it always seems like a very expensive meal to buy at a restaurant, seeing as it is only a small piece of vegetable wrapped in a palm-full of rice. I have always been tempted to make my own sushi, but never seemed to have the time to actually pull it off. So when Rose asked me what I wanted to make for my birthday dinner, sushi seemed like the perfect choice!

Neither of us had ever made sushi, nor did we do any research like we normally do before trying a new dish. We entered the kitchen with a pot of sticky rice, nori (seaweed paper), some veggies, and tempura batter and just went at it.
First was prepping all the veggies and cutting them into small, thin pieces. We started with carrot, cucumber, avocado, and red pepper. Next, we cut up some sweet potato, onion, zucchini, yellow squash, green beans, and mushrooms to be fried in the tempura batter.

We started frying the tempura vegetables until they were golden brown in a pot of hot peanut oil. I never fry unless I have to since I have an aversion to flesh-burning-hot oil for some reason…but I overcame this apprehension for my love of tempura. For the most part, the frying went well and there were no serious burns or other injuries.

After the cutting and frying was complete, we were ready to start rolling the sushi! Thankfully the nori package had directions and little diagrams. While sushi seems somewhat self-explanatory, once you are standing there in front of the sushi mat, the task seems slightly daunting that first time. We placed a sheet of nori on a sushi mat and then spread about a ½ cup of sticky rice over the nori. Starting with the end closest to us, we started laying the veggies in thin rows next to each other. I then started rolling the mat up, making sure to squeeze the sushi roll right throughout so that it keeps its form.

Once rolled, we cut the sushi into 6-8 pieces. After trial-and-error, we discovered that you have to cut the roll in the same direction that the nari was rolled. If not, the cuts become rough and the sushi pieces start to fall apart.

I was surprised to find how easy it was make the sushi rolls! We served the sushi and tempura vegetables with a side of soy sauce, soy & wasabi, and teriyaki. For about the same price of ordering a few rolls of sushi at a restaurant, we were able to make easily 50 pieces, enough to feed four people and still have leftovers for another meal.

This will be my last DC post for about 7 months, since I will be moving back to Baltimore for three weeks before I leave for Tucson, AZ! But that does not mean the end of posts! I will continue writing about my cooking experiences from across the country plus my experiences working at the Tucson food bank. I am sure there will be an increase in the amount of ice cream I make since I hear the heat can be atrocious.

So please leave some ideas for a fun/crazy/unique ice cream flavor for me to (try to) make!
Also, I added a little gadget to the top right of the page so you can subscribe and be told whenever I post something new. Or add the Hungry Sprout to Google Reader, a nifty new application I started using myself for reading blogs!

Saturday, August 9, 2008
The Last Operation Frontline Class
This morning was my last Operation Frontline class at the Ward 8 farmers market in Anacostia. The theme for the last class with other OFL lessons is usually something along the lines of “healthy baking,” but since we only have a single burner the ability to bake anything was nonexistent. So instead we made fruit smoothies and pancakes! I am a firm believer that this world would be a better place if people only ate more pancakes, so it seemed like a fun and delicious was to end the class.
The fruit smoothies were simply a mixture of ice, fruit, milk, yogurt, and a little bit of honey. We used two bananas, and a couple peaches, apricots, and nectarines. My favorite farmer from the market, Carl, (who’s farm is certified Naturally Grow in PA) gave us a bunch of seconds (produce that is bruised or blemished, not pretty enough to sell but usually still delicious after a few spots have been cut away) and so Ona & I talked about how smoothies were a great way to use seconds or even fruit that has been bruised or is going bad at home.
Fruit Smoothies
1 C ice cubes
1 C fresh fruit (berries, peaches, bananas, etc)
1/2 C milk (or soy milk)
1/4 C Yogurt (plain or vanilla)
1 Tbsp Honey
Add ingredients in a blender and puree until smooth.
Usually our technology for this class is limited to the portable gas burner and so we felt pretty adventurous breaking into the realms of a blender powered by a generator (kindly given to us by Virginia, one of the women in charge of the market). What seemed to be ice jamming the blender turned out to be the generator just not having enough power to blend anything! So Ona walked somewhere and found an outlet to blend everything together. She came back a few minutes later with delicious smoothies!
I was unsure where Ona went since I was preoccupied making a blackberry sauce that would later be used to top the pancakes. This is a sauce that I throw together pretty often making pancakes or waffles, and I usually use whatever berries I have on hand (strawberries, raspberries, or blueberries work very well in this recipe too. And while I’ve never tried it, I have no doubt a mixture of all of them would be great!)
Berry Sauce
1 pint blackberries berries
1/3 C brown sugar
3 Tbsp lemon juice
1 Tbsp water
1 1/2 tsp cornstarch (or 1 Tbsp flour)
Mix berries, sugar, and lemon juice in a pot and heat over medium heat for a few minutes, until the juice starts to come out of the berries. In a small bowl, whisk in water to corn starch and mix into berry mixture. Cook over heat for a minute or two to allow sauce to thicken.
Once the sauce was done, I took it off the burner and got started on the pancake mix. Instead of using a plain mix, I figured it would be fun and more nutritious to make multigrain pancakes. I threw this recipe together from the Joy of Cooking and a few I found online.
Multi-grain Pancakes
1 cup whole wheat flour
1/3 cup quick cook oats
1/3 cup yellow cornmeal
1/3 cup flour
2 t baking powder
1/4 t baking soda
1/4 t salt
2 cups milk
2 eggs
2 T apple sauce (or vegetable oil)
2 T honey
1 t vanilla
Mix first seven ingredients in a medium bowl.
In a large bowl, whisk together buttermilk, eggs, butter, honey and vanilla.
Add dry ingredients; mix well. Heat a large frying pan over medium heat. Spray with cooking spray.
When pan is quite hot, pour in 1/4-1/3 cup batter. Cook until bubbles pop, flip and cook until brown.
While the pancakes were cooking, Ona gave a lesson on healthy drinks and the dangers of soda, Gatorade, etc. She did a demonstration in which she held up different beverage packages (a Pepsi bottle, Gatorade bottle, and a Starbucks cup). For each, Ona would ask the class participants to guess how much sugar is in each of these drinks. She would then pull out sugar packets totally the amount of actual sugar found in these drinks all taped together. Needless to say, people were shocked and sickened to see just how much sugar is actually in these drinks! Its one think to see the amount of grams on the back of a label, but to physically see just how much sugar is in a drink is quite another thing! Ona continued by talking about the benefits of drinking water, so as not to get too many empty calories and sugar from all of these drinks.
Then we ate! The pancakes were a hit and the blackberry sauce lasted no longer than a few minutes! I was happily surprised that the pancakes weren’t as heavy and dense as I expected from a multi-grain batter.
Unfortunately, I had to say our goodbyes to the class participants, Ona, and Batina. The OFL class has truly been an incredible and invaluable experience for me. I am so thankful that I was given the opportunity to volunteer this summer by doing what I love and sharing my passion for food with others. I found that I learned a lot about nutrition from the classes and I learned how to cook in front of others. Most importantly, I was able to see malnutrition first-hand in my community while hopefully creating a sense of empowerment within the people we talked to, showing how they can create healthy and affordable meals for themselves and their famines, while using fresh, local (and hopefully organic as much as possible!) produce. I hope that when I return to DC at the end of February, I will be able to continue volunteering with OFL and the food bank, and hopefully teach this same class at the market again!
Sunday, August 3, 2008
Healthy Snacks at OFL
This past Saturday was the fourth Operation Frontline class and the lesson for the day was healthy snacking. One led a good discussion on what constitutes a healthy snack and how to shop for them. She drew a diagram of a typical supermarket and showed how shopping on the periphery of the store can help ensure that you are purchasing the healthiest, most fresh, and often cheapest food in the store.
My recipes for the day were hummus, guacamole, and tofu in a Chinese peanut sauce. I started by sautéing the tofu in the very begging of the class since that took almost 30 or 40 minutes for the tofu to fully cook. This was started before Ona’s discussion and went through the rest of the demo. While the tofu was cooking, I moved on to the hummus and guacamole.
Hummus
1 (15 ounce) can garbanzo beans, drained, liquid reserved
1 clove garlic, crushed
2 teaspoons ground cumin
1/2 teaspoon salt
1 tablespoon olive oil
Directions:
Mash garbanzo beans with a fork (or blend in blender or food process if available). Add the garlic, cumin, salt and olive oil. Enjoy with pita, tortilla chips, or veggies!
I used a hummus recipe that did not call for tahini, like most traditional recipes, since it is quite expensive and often difficult to find at many grocery stores. We also did not have a food processor since there is no electricity, so we used a potato masher instead. The hummus turned out well and was a big hit with the class. It was eaten with cut up peppers, cucumbers, and tortilla chips. Next was the guacamole:
Guacamole
4 avocados - peeled, pitted, and mashed
1 lime, juiced
1 teaspoon salt
1/2 cup diced onion
3 tablespoons chopped fresh cilantro
2 roma (plum) tomatoes, diced
1 teaspoon minced garlic
1 pinch ground cayenne pepper (optional)
Directions:
In a medium bowl, mash together the avocados, lime juice, and salt. Mix in onion, cilantro, tomatoes, and garlic. Stir in cayenne pepper. Refrigerate 1 hour for best flavor, or serve immediately.
The guacamole was by far the biggest hit of the morning! People kept coming back up for this dip and I can’t say I blame them. I am huge guac fan, and this one turned out so well!
After the tofu had browned nicely on all sides, I sautéed some pepper, onion, zuchinni, and squash in a little bit of olive oil while putting the peanut sauce together.
Tofu & Veggies in a Spicy Peanut Sauce
1 tablespoon olive oil
1 pound firm tofu, cubed
¼ onion, chopped
1 bell pepper, chopped
1 small zuchinni
1 small squash
Sauce
1/2 cup good peanut butter
1/2 cup hot water
2 Tbs. soy sauce
2 Tbs. sugar
3 medium cloves garlic, minced
1 tsp. cider vinegar (white vinegar would work too)
1 to 2 Tbs minced fresh cilantro
cayenne, to taste
salt, to taste (if peanut butter is unsalted)
DIRECTIONS
Heat oil in a large skillet over medium-high heat. Saute veggies and tofu for 5 minutes.
In a small bowl combine peanut butter, hot water, soy sauce, sugar, garlic, vinegar, cilantro, and cayenne. Pour over vegetables and tofu. Simmer for 3 to 5 minutes, or until vegetables are tender crisp.
The recipe for the sauce was taken from the Moosewood Cookbook, one of my all-time favorites. I make this recipe once every month or so and use it on anything from veggies, pasta, rice, and even sautéed spinach. So good!
Only one out of the eight participants in the class had ever tried tofu. While there was some hesitation, everyone tried it in the end. I would say about half the people liked it while the other half pushed it to the side while eating the veggies. It took me at least 10 tires before actually learning to enjoy tofu, so I am impressed with the fact that everyone tired and that some even liked it! Even for those that weren’t falling in love with the tofu, they seemed to enjoy the sauce, which is another plus!
Ona surprised me at the end of the class by pulling out homemade muffins with candles on them to celebrate my birthday (the following day, the day of this post…please feel free to send cooking or other baked goods my way. I am also a huge fan of cheesecake. Oreo please. Thanks!) and had the class sing. She also gave me an awesome Capital Area Food Bank apron, which is so cool ☺ Thank you so much Ona. That was amazing of you.
This class had the most talkative participants of all the classes by far! Everyone was engaged, asking questions and making comments throughout the class. I think people really learned a lot this class, plus they tried some new foods! A few participants came up after the class to thank us personally and shake our hands, which was really wonderful. Next week, the final class: fruit smoothies and pancakes!
I also tried to make an apple cider sorbet this week. I didn’t have a recipe to follow and just played it by ear…It tastes awesome (since cider can’t really not taste awesome) but it needs some work to prevent it from turning into a solid block of delicious ice. Next time, though, I will use cloves, cinnamon, nutmeg, etc and make spiced cider sorbet and hard cider sorbet. Yeah, I’m kind of in a cider kick. I think my body is craving autumn now that it is finally realizing I will be skipping autumn while in Arizona!
Monday, July 28, 2008
Breakfast Burritos & Bread
Saturday was the third Operation Frontline class and we focused on protein and dairy. The nutritionist, Suzie, from the first two lessons moved out of state so Ona, the program’s assistant coordinator has taken the reigns for the last few classes. For the first half of the class, we discussed the benefits of low-fat proteins and meat alternatives.
Ona conducted a powerful demonstration in which participants were given a sheet with the typical McDonalds and Chipotle menu with the total amount of fat and calories per meal. She then asked people to count the amount of fat they would get from a meal at these restaurants. The amount of fat from a cheeseburger, small fry, and an apple pie were scooped onto a piece of bread in the form of Crisco to show visually just how much fat is in fast food. In the end, there were 13 scoops of Crisco in this “fatty patty.” Everyone in the class seemed disgusted and I heard a few people mention how they would think twice before going to a fast food restaurant again.
For the cooking portion of the class we decided to make breakfast burritos and yogurt parfaits. We received fresh tomato, onion, and pepper from the farmers market for the burritos and blueberries (the best blueberries I have ever had probably!) and blackberries. The recipes are below:
Breakfast Burrito
2 eggs
2 tbsp milk (optional)
salt and pepper to taste
1/2 tsp cumin
1/2 red bell pepper, chopped
1/4 red onion
1/2 tomato, chopped
1 tbsp vegetable oil or butter or margarine
1/4 cup grated cheddar cheese
fresh cilantro
1 flour tortilla
In a small bowl, whisk the eggs together with the milk until well beaten and season with salt,pepper, and cumin.
Heat the oil or butter in a skillet or frying pan over medium-high heat. Saute the pepper,onion, and tomato on medium heat for 5 minutes. Carefully add the eggs. Cook, mixing frequently, until you have scrambled eggs of the desired consistency.
Place the scrambled eggs in the center of the flour tortilla, and top with cheese.
After cooking the eggs, we had the class come up and top the egg & veggies with cheese and salsa. I found this nifty guide online to show the “proper” burrito folding technique at http://howtowrapaburrito.com/ (the best part is the fact that someone actually bought the domain name for this…) The burritos were tasty and way better for you than a regular burrito at Chipotle! Pictures below are courtesy of the wonderful Ona (she is keeping an excellent blog about all of the DC Operation Fronline programs called A Generous Helping. It is also linked at the right of this page!


Yogurt Parfait
2 C vanilla yogurt
1 C granola
1 C fresh berries (blackberries, raspberries, blueberries, strawberries) or peaches
In a large glass or clear plastic cup, layer 1/2 of yogurt, 1/4 C granola, and 1/4 C fruit. Repeat layers
We used half vanilla yogurt and half plain yogurt mixed together, which cut the amount of sugar in half while keeping most of the sweetness. The class came up to the table to put together their own parfaits, which was fun!
The class had recent turnout and we decided to continue with the program for the last two weeks. Next Saturday will be healthy snacks!
On Sunday I made a loaf of honey oat bread to bring into the office. I used one of my favorite recipes that I found on allrecipes.com (a great site, by the way). The recipe can be found: here http://allrecipes.com/Recipe/Honey-Oatmeal-Bread-II/Detail.aspx
Somewhat similar to the gnocchi experience a few weeks ago, the dough kept sucking in all the flour I poured in since it was so freaking humid! I was about to give up on bread making in DC for the summer, but eventually a dough-like thing was forming.
I somehow managed to get the giant loaf (since all the extra flour!) into my bag and biked it work this morning. Seeing as it disappeared inside the first hour of the workday, I would say it was a success! The bread was incredibly soft and delicious. I normally follow the recipe by brushing honey and dropping oats on top after baking, but I left that step out this time since I figured sticky fingers on work keyboards would be a bad idea.
Thursday, July 24, 2008
Ginger Snap Ice Cream
After my semi-failed attempt at peach cobbler ice cream I had to get right back into making a new batch since I had some cream & milk that needed to get used before going bad. Ginger snap had been recommended as a potential flavor and while I usually think of ginger snaps and ginger bread as more of a winter flavor I figured I’d give it a try.
As always, I started with the French Vanilla recipe from JOY and added things to it to make this batch of ice cream.
French Vanilla Ice Cream (aka, the base to every ice cream I ever make)
2 C heavy whiping cream
1 C whole milk
2 egg yolks
3/4 C sugar
1/8 tsp. salt
1 tsp vanilla
After the custard was fully chilled (read below to the post entitled I Love Ice Cream More Than Words Can Say to get a full description of the custard-making process) I started by adding the spices. I found a recipe online that seemed similar to what I was going for and so I started by adding the recommended amount of cinnamon, nutmeg, and ginger but found that this was not nearly as flavorful as I was hoping for, so I just added tons and tons until the flavor seemed right. I also added freshly ground cloves to the mix.
Two minutes before the ice cream was done churning, I added crushed up ginger snap cookies. A handful of the best store-bought ginger snaps I have ever tasted were donated to me by Sally. They taste like real ginger and are incredibly crisp. I was worried that they would be too hard, but the cream softened them up a great deal and they scoop out easily with the ice cream.
The ginger snap ice cream turned out very well and I will be sure to make it again, regardless of the season.

Does anybody have recommendations for the next ice cream flavor? I am thinking bananas foster but am open to ideas!
Monday, July 21, 2008
The Past Week
I haven't had time to post in a week but I have been able to squeeze in a little bit of cooking. I should mention that the peach cobbler ice cream tasted quite good but the texture…horribly icy and I’m not sure why. I think the peaches weren’t ripe enough or something, but I will definitely be trying again.
On Wednesday night, Rose and I had some leftover gnocchi to finish off so she made an incredible sauce out of ricotta, half-and-half, white wine, rosemary, and some other herbs. We made it up on the spot and there is no recipe, but it was delicious. We also made an omelet with tomato, mozzarella, and basil (possibly my favorite combination of foods ever, and one we throw together in one form or another at least once a week). Thursday was homemade pizzas with my fellow interns topped with tons of veggies while watching Clueless. The dough was from Trader Joe’s, which saved a few hours of waiting for it to rise, plus it had herbs & garlic in it, and you can rarely go wrong with herbs and garlic. Friday night I just sautéed veggies in tons of garlic and tossed it with whole-wheat pasta and feta.
Saturday morning was my second OFL class at the farmers market. At first no one was showing up and we were unsure if we were even going to go through with the class. Eventually a few people did show and we decided to start since we were there and had all the produce ready. This week’s lesson was on fruits and vegetables. I first made a corn & black bean salsa with the below recipe that I compiled from a few different ones I found online:
Corn & Black Bean Salsa
1 can black beans, rinsed
1 1/2 C corn kernels (about 4 ears)
1/4 C onion, finely chopped
1/2 C red bell pepper,chopped
2 Tbsp fresh cilantro, chopped
4 Tbsp olive oil
Salt and Pepper, to taste
Drain and rinse the black beans in a colander. Cut fresh corn off the cob. Finely chop onion, pepper, and cilantro. Add all ingredients into a bowl; add salt & pepper to taste. Mix together with olive oil. For best taste, let sit covered in the fridge for at least an hour, but can be eaten immediately.
Since we don’t have a fridge, we let the salsa sit until the end of the lesson for the flavors to combine. I next made a “fruit salsa,” which was actually a fruit salad. I had a recipe but everyone forgot to print it out, so we just added everything we had: a few peaches, a mango, a few golden kiwis, papaya, blueberries, and a pineapple. We topped it all with a splash of orange juice and honey.
The two salsas were eaten at the end of the lesson, and they seemed to be a hit. I think the veggie salsa needed some more salt and cumin but besides that everything was delicious. Below are a few pictures taken by my fellow foodie intern, Julie (one amazing food photographer, by the way)


Unfortunately, only one person from the first week showed up to the class so much of the time was spent reviewing what we did the prior week (the food pyramid, whole grains). Even so, the people did show up seemed to learn some and enjoyed themselves. We decided to try one more class next week and determine if we finish out the last two weeks. The classes are meant to be a comprehensive nutrition cooking class and if people only show up for one or two classes they do not get the entire message and we have to spend time going back over everything we’ve already discussed. I mentioned that I am up for staying with the class as long as Operation Frontline wishes to keep it going. So we shall see how this Saturday goes.
Right after the class Rose and I went to Rehoboth beach! By far the most relaxing and amazing weekend I have had in a long time. On Sunday morning, Rose’s aunt made French toast for breakfast and so we caramelized peaches to put on top. To do this we melt some butter and mix in brown sugar, cinnamon, and a dash of nutmeg and cooked the peaches in this deliciously unhealthy mixture for a few minutes. So good.
Be on the lookout this week for a new ice cream (maybe bananas foster or ginger snap) and anything else I can think up! If anyone is reading and has an awesome recipe you should share it ☺ I will also try to start taking more pictures of the food to share with everyone!
Subscribe to:
Posts (Atom)

