As promised, I have made an ice cream flavor recommended by a reader! Thanks to a comment posted by “bite me,” I made mango saffron ice cream yesterday to give to a friend as a graduation gift. As with all my ice creams, I used my standard recipe for French vanilla while making a few changes.
I started by bringing 1½ C milk to a simmer with about ¼ teaspoon of saffron. Once small bubbles started to appear, to took the pot off the heat and let the saffron steep for 30 minutes.
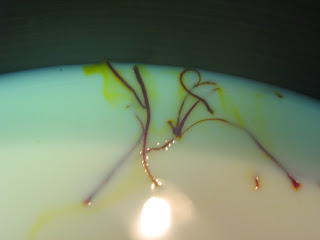
Next, I strained the saffron out of the milk and continued with the rest of the recipe. I added ¾ C sugar to the milk and brought this back to a simmer. I then tempered in two egg yolks and stirred for about 10 minutes, until a thick custard was formed. The custard was then put in the fridge to cool for a few minutes.
Meanwhile, I cut and pureed two mangos. Once the custard had cooled some, I added two cups of heavy whipping cream and stirred in the mango puree. This mixture was then placed in the fridge to cool for a few hours before placing it in the ice cream maker for 15 minutes.
I was unsure how this recipe would work out and was pleasantly surprised at how well it turned out! You first taste the mango by itself, and then slowly the saffron comes in at the end. Both flavors are very subtle and nice. This ice cream mixes a pleasant amount of sweetness from the mango and savory from the saffron to create a unique and incredibly enjoyable dessert. Thanks so much to “bite me” for the recommendation!
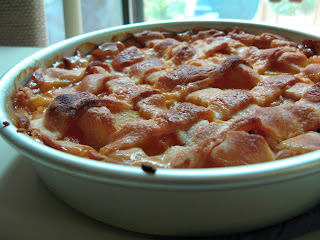
That same afternoon I made a peach pie to bring to a dinner party at night. The recipe I used from the Joy of Cooking (a.k.a. the Bible) called for homemade pie dough for the crust. Normally, I avoid store-bought dough at all costs, but do to a lack of time (and a lack of shortening, which is required for any successful pie crust that is both soft and flaky, thank you Alton Brown) I bought a box of two rolls of pie crust. The recipe is as follows, changed slightly from the original to match my adjustments:
Peach Pie
Line a 9-inch pie pan with:
1 rolled out pie dough (store bought or home-made)
Preheat the oven to 425º F.
Peel, pit, and slice ¼ inch thick:
2 ½ pounds peaches (6 peaches for me)
Combine in a bowl with:
½ C sugar
3 Tbsp all-purpose flour
3 Tbsp lemon juice
1/8 teaspoon salt
Let stand for 15 minutes, stirring occasionally. Pout the filling into the bottom crust and dot with:
2 Tbsp unsalted butter, cut into small pieces
Cover the pie with a lattice made from a second piece of rolled out pie dough. Lightly brush this top crust with:
Milk
Sprinkle with:
2 Tbsp sugar
Bake about 55 minutes. Cool completely on a rack.
The pie was incredible and was better than any store-bought peach pie I have ever had. Making the lattice was easy, and was simply done by cutting strips about an inch thick out of rolled out pie dough, laying about half horizontally and then covering those with the other strips vertically. Brushing the top with milk definitely gave the pie a gorgeous golden brown color. Pictures are below!
Sunday, August 17, 2008
Monday, August 11, 2008
Sushi Party!
The last piece of meat I have ever eaten was sushi in Kobe, Japan. I thought it would be the most ceremonious way to end my carnivorous career and indeed eating raw octopus and some other unidentified raw fish (I can only hope they were some kind of sea creature) was an experience! I had always been a huge fan of sushi before, my favorite being shrimp tempura. In fact, shrimp tempura is one of the only meat-filled foods I ever crave anymore. I do love veggie sushi, particularly avocado rolls and asparagus tempura rolls, but it always seems like a very expensive meal to buy at a restaurant, seeing as it is only a small piece of vegetable wrapped in a palm-full of rice. I have always been tempted to make my own sushi, but never seemed to have the time to actually pull it off. So when Rose asked me what I wanted to make for my birthday dinner, sushi seemed like the perfect choice!
Neither of us had ever made sushi, nor did we do any research like we normally do before trying a new dish. We entered the kitchen with a pot of sticky rice, nori (seaweed paper), some veggies, and tempura batter and just went at it.
First was prepping all the veggies and cutting them into small, thin pieces. We started with carrot, cucumber, avocado, and red pepper. Next, we cut up some sweet potato, onion, zucchini, yellow squash, green beans, and mushrooms to be fried in the tempura batter.
We started frying the tempura vegetables until they were golden brown in a pot of hot peanut oil. I never fry unless I have to since I have an aversion to flesh-burning-hot oil for some reason…but I overcame this apprehension for my love of tempura. For the most part, the frying went well and there were no serious burns or other injuries.
After the cutting and frying was complete, we were ready to start rolling the sushi! Thankfully the nori package had directions and little diagrams. While sushi seems somewhat self-explanatory, once you are standing there in front of the sushi mat, the task seems slightly daunting that first time. We placed a sheet of nori on a sushi mat and then spread about a ½ cup of sticky rice over the nori. Starting with the end closest to us, we started laying the veggies in thin rows next to each other. I then started rolling the mat up, making sure to squeeze the sushi roll right throughout so that it keeps its form.
Once rolled, we cut the sushi into 6-8 pieces. After trial-and-error, we discovered that you have to cut the roll in the same direction that the nari was rolled. If not, the cuts become rough and the sushi pieces start to fall apart.
I was surprised to find how easy it was make the sushi rolls! We served the sushi and tempura vegetables with a side of soy sauce, soy & wasabi, and teriyaki. For about the same price of ordering a few rolls of sushi at a restaurant, we were able to make easily 50 pieces, enough to feed four people and still have leftovers for another meal.
This will be my last DC post for about 7 months, since I will be moving back to Baltimore for three weeks before I leave for Tucson, AZ! But that does not mean the end of posts! I will continue writing about my cooking experiences from across the country plus my experiences working at the Tucson food bank. I am sure there will be an increase in the amount of ice cream I make since I hear the heat can be atrocious.
So please leave some ideas for a fun/crazy/unique ice cream flavor for me to (try to) make!
Also, I added a little gadget to the top right of the page so you can subscribe and be told whenever I post something new. Or add the Hungry Sprout to Google Reader, a nifty new application I started using myself for reading blogs!
Saturday, August 9, 2008
The Last Operation Frontline Class
This morning was my last Operation Frontline class at the Ward 8 farmers market in Anacostia. The theme for the last class with other OFL lessons is usually something along the lines of “healthy baking,” but since we only have a single burner the ability to bake anything was nonexistent. So instead we made fruit smoothies and pancakes! I am a firm believer that this world would be a better place if people only ate more pancakes, so it seemed like a fun and delicious was to end the class.
The fruit smoothies were simply a mixture of ice, fruit, milk, yogurt, and a little bit of honey. We used two bananas, and a couple peaches, apricots, and nectarines. My favorite farmer from the market, Carl, (who’s farm is certified Naturally Grow in PA) gave us a bunch of seconds (produce that is bruised or blemished, not pretty enough to sell but usually still delicious after a few spots have been cut away) and so Ona & I talked about how smoothies were a great way to use seconds or even fruit that has been bruised or is going bad at home.
Fruit Smoothies
1 C ice cubes
1 C fresh fruit (berries, peaches, bananas, etc)
1/2 C milk (or soy milk)
1/4 C Yogurt (plain or vanilla)
1 Tbsp Honey
Add ingredients in a blender and puree until smooth.
Usually our technology for this class is limited to the portable gas burner and so we felt pretty adventurous breaking into the realms of a blender powered by a generator (kindly given to us by Virginia, one of the women in charge of the market). What seemed to be ice jamming the blender turned out to be the generator just not having enough power to blend anything! So Ona walked somewhere and found an outlet to blend everything together. She came back a few minutes later with delicious smoothies!
I was unsure where Ona went since I was preoccupied making a blackberry sauce that would later be used to top the pancakes. This is a sauce that I throw together pretty often making pancakes or waffles, and I usually use whatever berries I have on hand (strawberries, raspberries, or blueberries work very well in this recipe too. And while I’ve never tried it, I have no doubt a mixture of all of them would be great!)
Berry Sauce
1 pint blackberries berries
1/3 C brown sugar
3 Tbsp lemon juice
1 Tbsp water
1 1/2 tsp cornstarch (or 1 Tbsp flour)
Mix berries, sugar, and lemon juice in a pot and heat over medium heat for a few minutes, until the juice starts to come out of the berries. In a small bowl, whisk in water to corn starch and mix into berry mixture. Cook over heat for a minute or two to allow sauce to thicken.
Once the sauce was done, I took it off the burner and got started on the pancake mix. Instead of using a plain mix, I figured it would be fun and more nutritious to make multigrain pancakes. I threw this recipe together from the Joy of Cooking and a few I found online.
Multi-grain Pancakes
1 cup whole wheat flour
1/3 cup quick cook oats
1/3 cup yellow cornmeal
1/3 cup flour
2 t baking powder
1/4 t baking soda
1/4 t salt
2 cups milk
2 eggs
2 T apple sauce (or vegetable oil)
2 T honey
1 t vanilla
Mix first seven ingredients in a medium bowl.
In a large bowl, whisk together buttermilk, eggs, butter, honey and vanilla.
Add dry ingredients; mix well. Heat a large frying pan over medium heat. Spray with cooking spray.
When pan is quite hot, pour in 1/4-1/3 cup batter. Cook until bubbles pop, flip and cook until brown.
While the pancakes were cooking, Ona gave a lesson on healthy drinks and the dangers of soda, Gatorade, etc. She did a demonstration in which she held up different beverage packages (a Pepsi bottle, Gatorade bottle, and a Starbucks cup). For each, Ona would ask the class participants to guess how much sugar is in each of these drinks. She would then pull out sugar packets totally the amount of actual sugar found in these drinks all taped together. Needless to say, people were shocked and sickened to see just how much sugar is actually in these drinks! Its one think to see the amount of grams on the back of a label, but to physically see just how much sugar is in a drink is quite another thing! Ona continued by talking about the benefits of drinking water, so as not to get too many empty calories and sugar from all of these drinks.
Then we ate! The pancakes were a hit and the blackberry sauce lasted no longer than a few minutes! I was happily surprised that the pancakes weren’t as heavy and dense as I expected from a multi-grain batter.
Unfortunately, I had to say our goodbyes to the class participants, Ona, and Batina. The OFL class has truly been an incredible and invaluable experience for me. I am so thankful that I was given the opportunity to volunteer this summer by doing what I love and sharing my passion for food with others. I found that I learned a lot about nutrition from the classes and I learned how to cook in front of others. Most importantly, I was able to see malnutrition first-hand in my community while hopefully creating a sense of empowerment within the people we talked to, showing how they can create healthy and affordable meals for themselves and their famines, while using fresh, local (and hopefully organic as much as possible!) produce. I hope that when I return to DC at the end of February, I will be able to continue volunteering with OFL and the food bank, and hopefully teach this same class at the market again!
Sunday, August 3, 2008
Healthy Snacks at OFL
This past Saturday was the fourth Operation Frontline class and the lesson for the day was healthy snacking. One led a good discussion on what constitutes a healthy snack and how to shop for them. She drew a diagram of a typical supermarket and showed how shopping on the periphery of the store can help ensure that you are purchasing the healthiest, most fresh, and often cheapest food in the store.
My recipes for the day were hummus, guacamole, and tofu in a Chinese peanut sauce. I started by sautéing the tofu in the very begging of the class since that took almost 30 or 40 minutes for the tofu to fully cook. This was started before Ona’s discussion and went through the rest of the demo. While the tofu was cooking, I moved on to the hummus and guacamole.
Hummus
1 (15 ounce) can garbanzo beans, drained, liquid reserved
1 clove garlic, crushed
2 teaspoons ground cumin
1/2 teaspoon salt
1 tablespoon olive oil
Directions:
Mash garbanzo beans with a fork (or blend in blender or food process if available). Add the garlic, cumin, salt and olive oil. Enjoy with pita, tortilla chips, or veggies!
I used a hummus recipe that did not call for tahini, like most traditional recipes, since it is quite expensive and often difficult to find at many grocery stores. We also did not have a food processor since there is no electricity, so we used a potato masher instead. The hummus turned out well and was a big hit with the class. It was eaten with cut up peppers, cucumbers, and tortilla chips. Next was the guacamole:
Guacamole
4 avocados - peeled, pitted, and mashed
1 lime, juiced
1 teaspoon salt
1/2 cup diced onion
3 tablespoons chopped fresh cilantro
2 roma (plum) tomatoes, diced
1 teaspoon minced garlic
1 pinch ground cayenne pepper (optional)
Directions:
In a medium bowl, mash together the avocados, lime juice, and salt. Mix in onion, cilantro, tomatoes, and garlic. Stir in cayenne pepper. Refrigerate 1 hour for best flavor, or serve immediately.
The guacamole was by far the biggest hit of the morning! People kept coming back up for this dip and I can’t say I blame them. I am huge guac fan, and this one turned out so well!
After the tofu had browned nicely on all sides, I sautéed some pepper, onion, zuchinni, and squash in a little bit of olive oil while putting the peanut sauce together.
Tofu & Veggies in a Spicy Peanut Sauce
1 tablespoon olive oil
1 pound firm tofu, cubed
¼ onion, chopped
1 bell pepper, chopped
1 small zuchinni
1 small squash
Sauce
1/2 cup good peanut butter
1/2 cup hot water
2 Tbs. soy sauce
2 Tbs. sugar
3 medium cloves garlic, minced
1 tsp. cider vinegar (white vinegar would work too)
1 to 2 Tbs minced fresh cilantro
cayenne, to taste
salt, to taste (if peanut butter is unsalted)
DIRECTIONS
Heat oil in a large skillet over medium-high heat. Saute veggies and tofu for 5 minutes.
In a small bowl combine peanut butter, hot water, soy sauce, sugar, garlic, vinegar, cilantro, and cayenne. Pour over vegetables and tofu. Simmer for 3 to 5 minutes, or until vegetables are tender crisp.
The recipe for the sauce was taken from the Moosewood Cookbook, one of my all-time favorites. I make this recipe once every month or so and use it on anything from veggies, pasta, rice, and even sautéed spinach. So good!
Only one out of the eight participants in the class had ever tried tofu. While there was some hesitation, everyone tried it in the end. I would say about half the people liked it while the other half pushed it to the side while eating the veggies. It took me at least 10 tires before actually learning to enjoy tofu, so I am impressed with the fact that everyone tired and that some even liked it! Even for those that weren’t falling in love with the tofu, they seemed to enjoy the sauce, which is another plus!
Ona surprised me at the end of the class by pulling out homemade muffins with candles on them to celebrate my birthday (the following day, the day of this post…please feel free to send cooking or other baked goods my way. I am also a huge fan of cheesecake. Oreo please. Thanks!) and had the class sing. She also gave me an awesome Capital Area Food Bank apron, which is so cool ☺ Thank you so much Ona. That was amazing of you.
This class had the most talkative participants of all the classes by far! Everyone was engaged, asking questions and making comments throughout the class. I think people really learned a lot this class, plus they tried some new foods! A few participants came up after the class to thank us personally and shake our hands, which was really wonderful. Next week, the final class: fruit smoothies and pancakes!
I also tried to make an apple cider sorbet this week. I didn’t have a recipe to follow and just played it by ear…It tastes awesome (since cider can’t really not taste awesome) but it needs some work to prevent it from turning into a solid block of delicious ice. Next time, though, I will use cloves, cinnamon, nutmeg, etc and make spiced cider sorbet and hard cider sorbet. Yeah, I’m kind of in a cider kick. I think my body is craving autumn now that it is finally realizing I will be skipping autumn while in Arizona!
Subscribe to:
Posts (Atom)